# Work environment
WARNINGS
- You must have administrator rights to successfully install all these tools for your working environment!
- Follow the instructions below carefully/exactly! Different/deviant choices (version numbers, installation folders, ...) are at your own risk and are likely to cause problems!
# 1: laravel.bat
- Download laravel.bat (on your desktop)
- From this batch file you can easily perform the most frequently used actions for this course
- Switch between PHP 8.1 and PHP 7.4
- Start, stop, update, ... VirtualBox with the Homestead image
- Some other useful commands
- Double-click the file to run the script (This script must be run as administrator!)
- Type
smbaccountto create a new admin account for the SMB share (username:vagrant, password:homestead)
This account is used later to access the Homestead share from your host machine
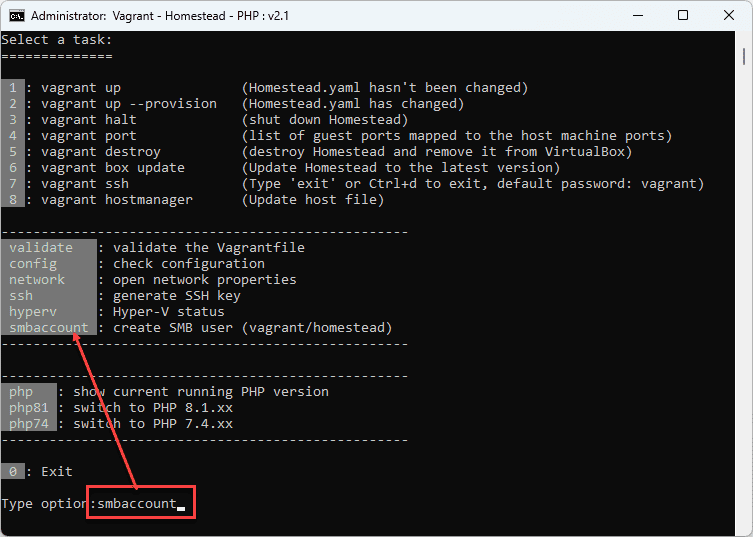
- Type
0to exit and close the file
# 2: Git Bash & Node.js
- Ensure that Node.js, NPM and a terminal (we prefer Git Bash) are installed on your machine
- Install the latest version of Git for Windows (opens new window) with the default installation settings
Windows Terminal with Git Bash
- Starting from Windows 10 version 1903, you can install the Windows Terminal (opens new window)
- If Windows Terminal is installed, you can add Git Bash to the list of available terminals by mark the checkbox Add the Git Bash profile to Windows terminal in the installation wizard
- Open a new terminal window ("Git Bash Here") and check your configuration
$ git --version git version 2.42.0.windows.1Copied!
1
2
2
- Install a recent LTS version (>= 18.x.x) of Node.js (opens new window) with the default installation settings
REMARKS
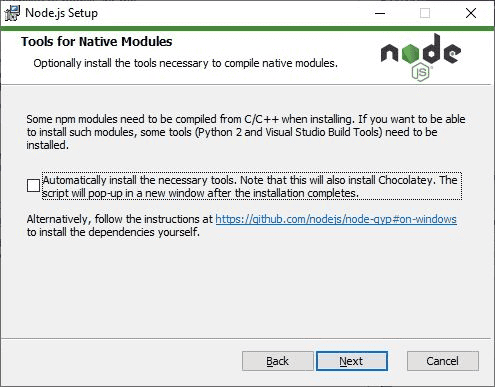
- Choose the default installation settings. As such, the "necessary tools" (including Chocolatey) don't need to be installed.
- In the rapidly evolving IT landscape it might occur that the latest versions of Git, Node.js (and npm) differ from the ones we installed when we wrote/updated this course (september 2022)
$ node -v && npm -v v18.17.1 9.6.7Copied!
1
2
3
2
3
# 3: PHP 8.1 and 7.4
- Download the ZIP-file with different PHP versions (opens new window) we prepared for you in advance
- Extract the zip-file in the root of your C-drive
C:\PHP\current: contains current running version (empty by default)C:\PHP\PHP8.1: contains a pre-configured version of PHP 8.1.xx (required for Laravel 9)C:\PHP\PHP74: contains a pre-configured version of PHP 7.4.xx (required for Laravel 7)
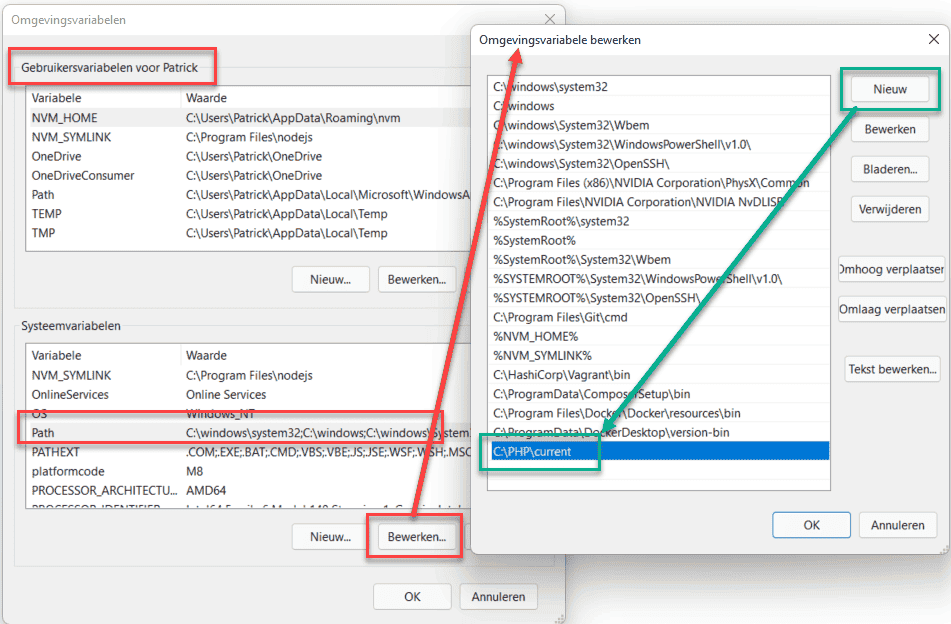
- Open Omgevingsvariabelen van het systeem bewerken (Edit the system environment variables)
- Click Omgevingsvariabelen... (Environment Variables...)
- Choose under Systeemvariabelen (System variables) the variable Path, and click on Bewerken... (Edit...)
- Click on Nieuw (New) and add C:\PHP\current
- Close the Omgevingsvariabelen (Environment Variables) panel entirely!
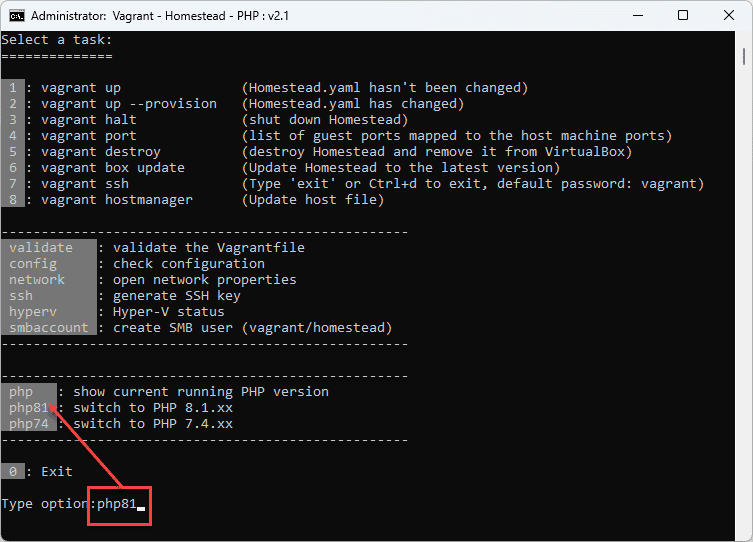
- Open laravel.bat en type
php81to set PHP 8.1.xx as the default PHP version - Open a new terminal window and check your configuration
- On the desktop, create a new folder phptest containing a new file index.php with the following content
<?php phpinfo();Copied!
1
2
2
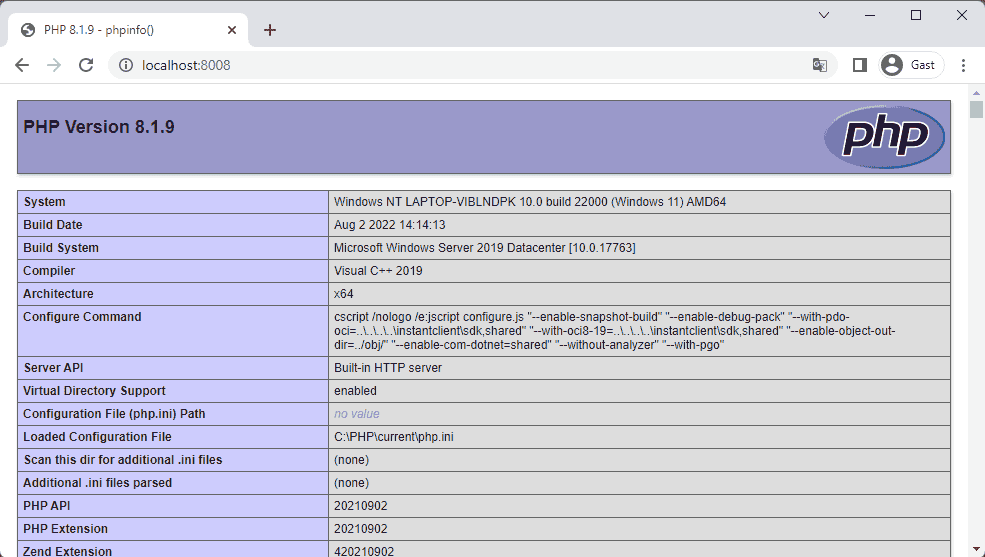
- Open a new terminal window inside the phptest folder and start PHP's local test server
$ php -S localhost:8008Copied!
1
- Open http://localhost:8008 (opens new window) in a browser
KEEP PHP 8.1 UPDATED WITH LAST PATCH VERSION (OPTIONAL)
- Patches often contain vital fixes for bugs and fixes to recently discovered security vulnerabilities
- Download the latest version of PHP 8.1.xx (opens new window) for Windows (VC16 x64 Thread Safe)
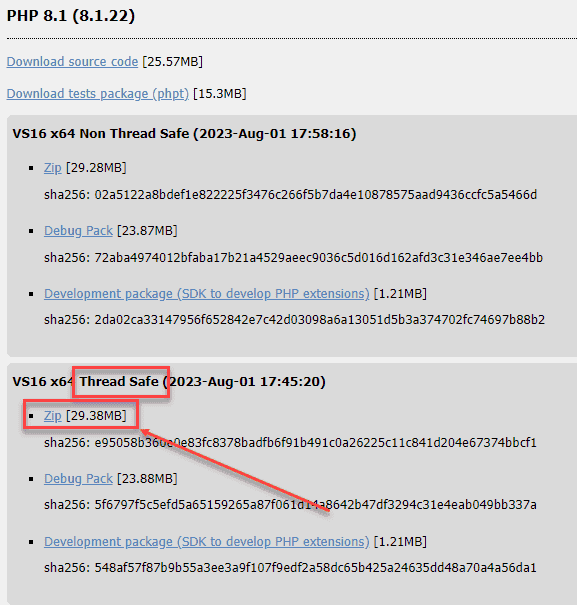
- Replace the content of C:\PHP\PHP81 with the content of this zip-file
- Duplicate the file C:\PHP\PHP81\php.ini-development and rename the file to php.ini
- Open php.ini in an editor and remove the
;(semicolon) in front of the most common extensionsextension_dir = "ext"extension=curlextension=fileinfoextension=gdextension=mbstringextension=odbcextension=opensslextension=pdo_mysqlextension=sockets
- Increase the memory limit (from 128M) to -1 (unlimited)
memory_limit = -1
- Open laravel.bat en type
php81to run to the updated version
# 4: Composer
- Composer (opens new window) is a dependency manager for PHP
- Download and install Composer: https://getcomposer.org/Composer-Setup.exe (opens new window)
- Open a new terminal window and check your configuration
$ composer -v ______ / ____/___ ____ ___ ____ ____ ________ _____ / / / __ \/ __ `__ \/ __ \/ __ \/ ___/ _ \/ ___/ / /___/ /_/ / / / / / / /_/ / /_/ (__ ) __/ / \____/\____/_/ /_/ /_/ .___/\____/____/\___/_/ /_/ Composer version 2.5.8 2023-06-09 17:13:21Copied!
1
2
3
4
5
6
7
8
2
3
4
5
6
7
8
TIP
You can update Composer with: $ composer self-update
# 5: Homestead
- Laravel Homestead (opens new window) is an official, pre-packaged Vagrant box that provides you a wonderful development environment
- Homestead lets you run PHP, a web server, and other server software inside VirtualBox
# Install VirtualBox & Vagrant
- Install the latest version of VirtualBox 7.0.xx (opens new window)
WARNING
- If you are using Windows, you may need to enable hardware virtualization (VT-x). It can usually be enabled via your BIOS (https://www.youtube.com/watch?v=mFJYpT7L5ag (opens new window))
- If you are using Hyper-V on a UEFI system (opens new window) you may additionally need to disable Hyper-V in order to access VT-x.
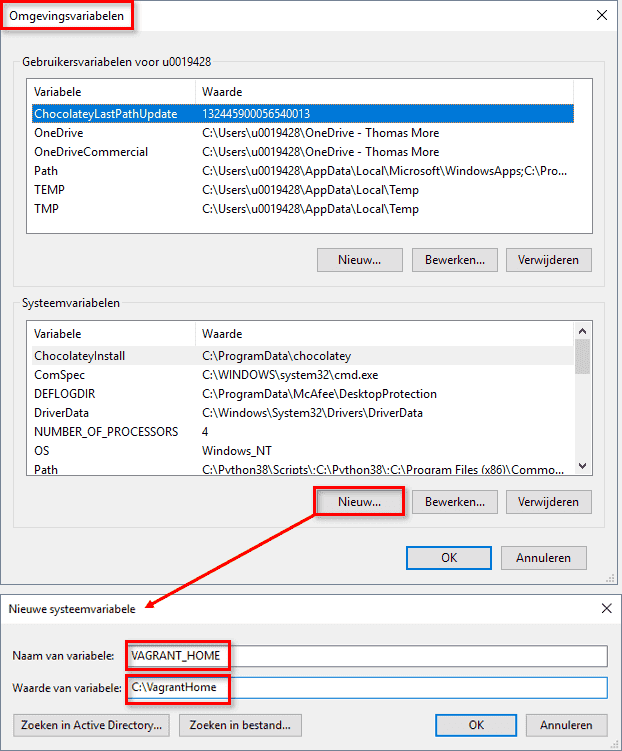
- Open Omgevingsvariabelen van het systeem bewerken (Edit the system environment variables)
- Click Omgevingsvariabelen... (Environment Variables...)
- Click under Systeemvariabelen (System variables) on Nieuw... (New...)
- Naam van de variabele (Variable name): VAGRANT_HOME
- Waarde van de variabel (Variable value): C:\VagrantHome
- Install Vagrant (opens new window) (Amd64 version) and restart your laptop
- Install the vagrant-hostmanager (opens new window) and vagrant-vbguest (opens new window) plug-ins with the following command
$ vagrant plugin install vagrant-hostmanager vagrant-vbguestCopied!
1
IMPORTANT
vagrant-hostupdater is a Vagrant plugin that automatically updates the C:\Windows\System32\drivers\etc\hosts file when local domains
(e.g. homestead.test) are added or removed from the Vagrantfile.
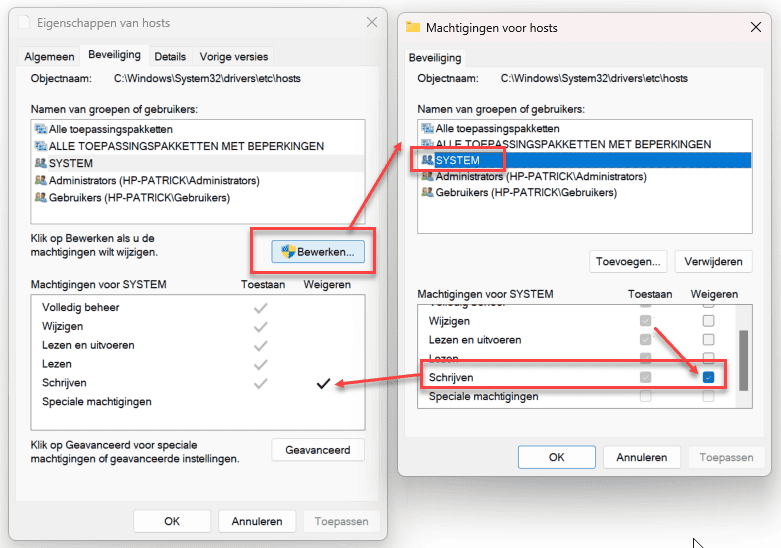
To prevent certain background processes from disabling the added hosts, it is important that you adjust the security settings on the hosts file!
- Right click on
C:\Windows\System32\drivers\etc\hostsand select Eigenschappen (Properties) - Click on the Beveiliging (Security) tab
- Click on Bewerken (Edit)
- Set Schrijven -> Weigeren (Write -> Deny) for the System Group to keep the the added hosts "alive"
- Create, at the root of your C-drive, two new folders
- C:\vagrant (where you save the configuration files of the Vagrant box, the box itself will be stored in C:\VagrantHome\boxes)
- C:\sites_laravel (where you store your websites)
# Generate SSH key
- Homestead requires an SSH key, so first check if the key exists
- Open the file explorer and go to
%UserProfile%\.ssh\id_rsaorC:\Users\user_name\.ssh\id_rsa- If this file exists, you don't need to do anything
- If this file does not exist, open Git Bash in a random location and generate an SSH key with the command
ssh-keygenand click a few times onenter
At the end, you get to see a random image like the one below
$ ssh-keygen Generating public/private rsa key pair. Enter file in which to save the key (/c/Users/Patrick/.ssh/id_rsa): Enter passphrase (empty for no passphrase): Enter same passphrase again: Your identification has been saved in /c/Users/Patrick/.ssh/id_rsa Your public key has been saved in /c/Users/Patrick/.ssh/id_rsa.pub The key fingerprint is: SHA256:fzbs72AhwtQWQzIuUQAqur4KLppnhksUbC7ndl00JHE Patrick@LAPTOP-VIBLNDPK The key's randomart image is: +---[RSA 3072]----+ | ..oo+.+ | |. . o + o | |.+. . E o o | |+.. o + . | |oo. . o S . . | |o+ . + . o o . | |ooo o o . B | |Bo+. . = o | |OO. .oo | +----[SHA256]-----+Copied!1
2
3
4
5
6
7
8
9
10
11
12
13
14
15
16
17
18
19
20
21
# Install Homestead
- Open Git Bash in the C:\vagrant folder and execute the following commands
$ git clone https://github.com/laravel/homestead.git $ cd homestead $ git checkout release $ bash init.sh $ vagrant upCopied!
1
2
3
4
5
2
3
4
5
REMARK
- Vagrant must first download the Homestead Virtualbox (1.7GB) and this may take several minutes so be patient and have a cup of coffee...
- After the command
vagrant up, give the necessary permissions to VirtualBox if asked for
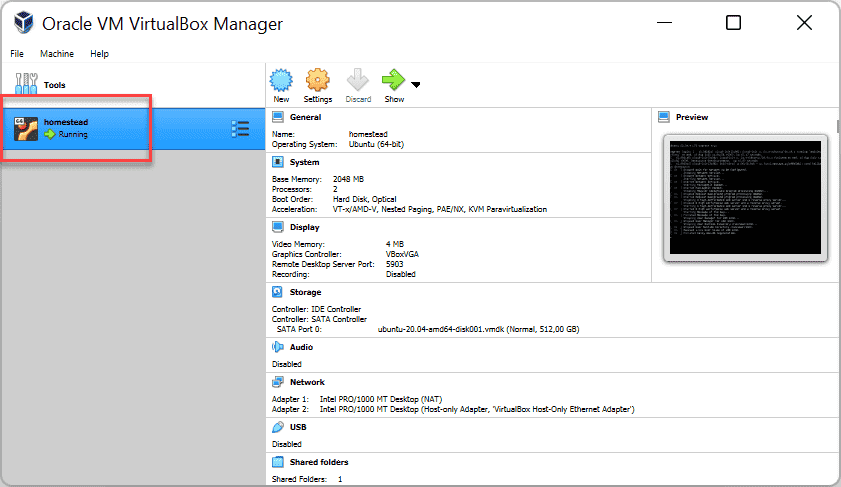
- The Vagrant homestead box now appears inside VirtualBox
- In the C:\vagrant\homestead folder, open the Homestead.yaml file and adjust the configuration (use a backslash instead of a slash!)
--- ip: "192.168.56.56" memory: 2048 cpus: 2 provider: virtualbox backup: true # add this line authorize: ~/.ssh/id_rsa.pub keys: - ~/.ssh/id_rsa folders: - map: C:\sites_laravel # change this line (use a backslash instead of a slash!) to: /home/vagrant/code smb_username: vagrant # add this line smb_password: homestead # add this line mount_options: ["username=vagrant","password=homestead","vers=3.02", "mfsymlinks"] # add this line sites: - map: homestead.test to: /home/vagrant/code # change this line (remove /public) php: "8.1" # run this site with PHP 8.1.x databases: - homestead features: - mysql: true - mariadb: false - postgresql: false - ohmyzsh: false - webdriver: false services: - enabled: - "mysql" # - disabled: # - "postgresql@11-main" ports: # uncomment this line (remove #) - send: 33060 # MySQL/MariaDB # uncomment this line (remove #) to: 3306 # uncomment this line (remove #) # - send: 4040 # to: 4040 # - send: 54320 # PostgreSQL # to: 5432 - send: 8025 # Mailhog # uncomment this line (remove #) to: 8025 # uncomment this line (remove #) # - send: 9600 # to: 9600 # - send: 27017 # to: 27017Copied!
1
2
3
4
5
6
7
8
9
10
11
12
13
14
15
16
17
18
19
20
21
22
23
24
25
26
27
28
29
30
31
32
33
34
35
36
37
38
39
40
41
42
43
44
45
46
47
48
49
50
51
52
53
2
3
4
5
6
7
8
9
10
11
12
13
14
15
16
17
18
19
20
21
22
23
24
25
26
27
28
29
30
31
32
33
34
35
36
37
38
39
40
41
42
43
44
45
46
47
48
49
50
51
52
53
EXPLANATION
- Line 6: Homestead automatically backups all your databases (listed under databases: on line 24) when your Vagrant box is destroyed
The backup files can be found in the folder C:\vagrant\homestead\.backup\mysql_backup - Line 14: the base folder for all your Laravel sites
- Line 16-18: we use SMB (opens new window) (Samba) to share the folder with the Vagrant box because this is the fastest way to share files between the host and the guest
- Line 22-23: homestead.test is now mapped to C:/sites_laravel and runs with PHP 8.1.x
- Line 41: make additional ports accessible outside the box
- Line 42-43: we use MySQL for all our databases
- Line 48-49: we use Mailhog as a local SMTP server
Remarks about the yaml file
- A YAML file is a YAML Ain't Markup Language file and is used to store configuration data
- YAML files are indented with spaces (not tabs)
- YAML files are case sensitive
- Indentation is also very important in YAML files, so make sure you indent the lines correctly
- TIP: type
validatein laravel.bat to check if the formatting of the Homestead.yaml file is correct
- Some examples of a valid and invalid YAML file:
Example 1 (valid)
Example 2 (invalid)
Example 3 (invalid)
folders: - map: C:\sites_laravel # change this line (use a backslash instead of a slash!) to: /home/vagrant/code smb_username: vagrant # add this line smb_password: homestead # add this line mount_options: ["username=vagrant","password=homestead","vers=3.02", "mfsymlinks"] # add this lineCopied!
1
2
3
4
5
6
2
3
4
5
6
- In the C:\vagrant\homestead folder, open the Vagrantfile file and add
config.ssh.insert_key = falseinsideVagrant.configure
... Vagrant.configure(VAGRANTFILE_API_VERSION) do |config| config.ssh.insert_key = false if File.exist? aliasesPath then config.vm.provision "file", source: aliasesPath, destination: "/tmp/bash_aliases" config.vm.provision "handle_aliases", type: "shell" do |s| s.inline = "awk '{ sub(\"\r$\", \"\"); print }' /tmp/bash_aliases > /home/vagrant/.bash_aliases && chown vagrant:vagrant /home/vagrant/.bash_aliases" end end ... endCopied!
1
2
3
4
5
6
7
8
9
10
11
12
2
3
4
5
6
7
8
9
10
11
12
- Create inside the C:\sites_laravel folder a file index.php with the content
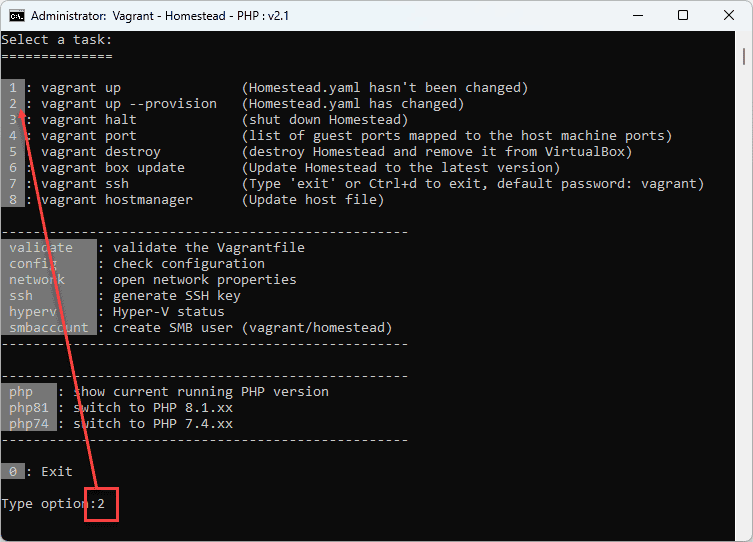
<?php echo phpinfo(); - Restart the server with option
2from laravel.bat
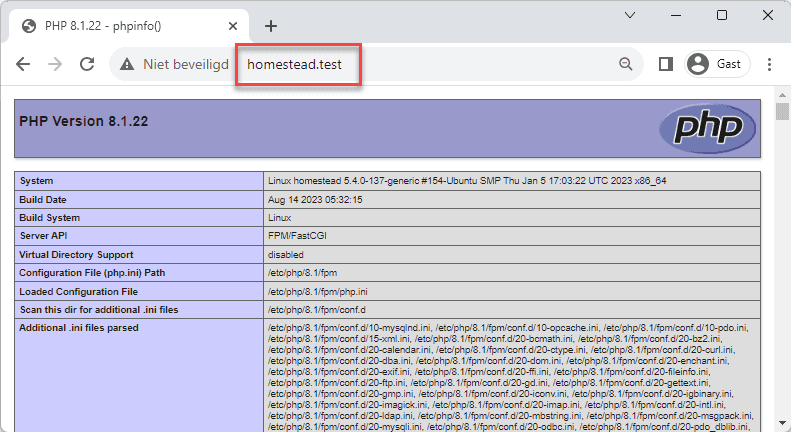
- Open http://homestead.test (opens new window) in a browser
TIP
- Sometimes VirtualBox is running slowly when Hyper-V is running
- You can disable/enable Hyper-V with the Hyper-V Switch (opens new window) application
# 6: PhpMyAdmin
phpMyAdmin is a free software tool written in PHP, intended to handle the administration of MySQL over the Web
- Download phpMyAdmin (opens new window)
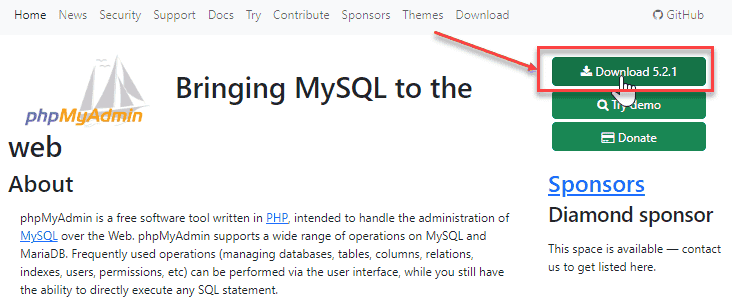
- Unzip the file at the root of C:\sites_laravel and rename the folder to phpMyAdmin (C:\sites_laravel\phpMyAdmin)
- Open C:\vagrant\homestead\Homestead.yaml and add, under sites, a new path to phpMyAdmin
sites: - map: homestead.test to: /home/vagrant/code # change this line (remove /public) php: "8.1" # run this site with PHP 8.1.x - map: phpmyadmin.test to: /home/vagrant/code/phpMyAdmin php: "8.1"Copied!
1
2
3
4
5
6
7
2
3
4
5
6
7
- Next, run option
2from laravel.bat to restart the server

- phpMyAdmin is also available at http://phpmyadmin.test (opens new window)
- Login with name homestead and password secret
# Auto login
- If you want, you can make sure that you are automatically logged in
- Open the folder C:\sites_laravel\phpMyAdmin
- Rename (or duplicate and rename) config.sample.inc.php to config.inc.php
- Open config.inc.php
- Find the variable
$cfg['Servers'][$i]['auth_type']and change the variable value from'cookie'to'config' - Add three extra lines of code
$cfg['Servers'][$i]['auth_type'] = 'config'; // Change from 'cookie' to 'config' $cfg['Servers'][$i]['user'] = 'homestead'; $cfg['Servers'][$i]['password'] = 'secret'; $cfg['CheckConfigurationPermissions'] = false;Copied!
1
2
3
4
5
2
3
4
5
# 7: PhpStorm
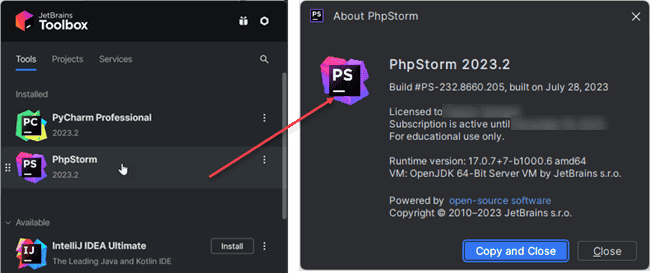
- Ensure that you have an up-to-date version of PhpStorm on your machine
(Follow the installation guide on our Web Advanced course (opens new window))