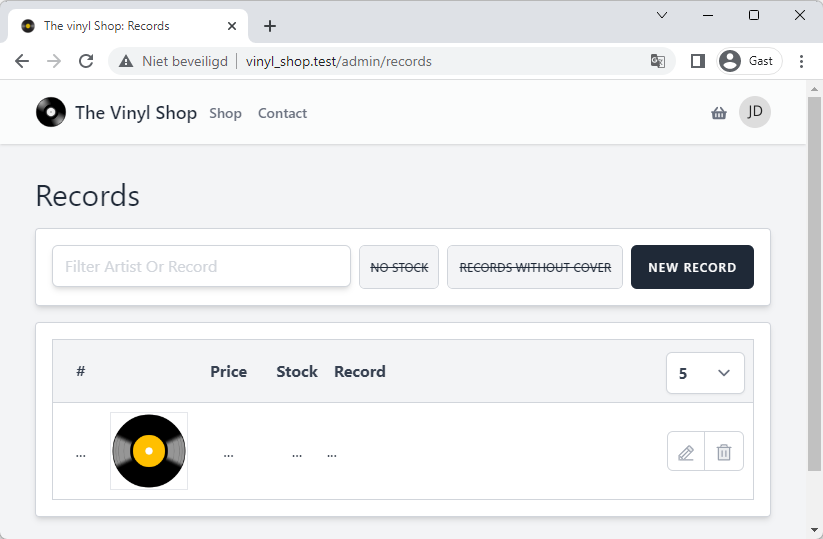
Create a new Livewire component with the terminal command php artisan make:livewire Admin/Records
app/Http/Livewire/Admin/Records.php (the component class)
resources/views/livewire/admin/records.blade.php (the component view)
Open the component class and add the vinylshop layout
classRecordsextendsComponent{publicfunctionrender(){returnview('livewire.admin.records')->layout('layouts.vinylshop',['description'=>'Manage the records of your vinyl shop','title'=>'Records',]);}}
Add a new get-route for the admin/records to the routes/web.php file
and change the route to the old get-route torecords_old and it's name to records.old
Update the navigation menu in resources/views/livewire/layout/nav-bar.blade.php
Line 10: change the old get-route to records_old and it's name to records.old
Line 11: add a new route in the admin group
The URL is admin/records (prefix is already set to admin)
The component is the Records class
The route name is admin.records (the group name is already set to admin.)
the extra cover key contains the path to the cover image
Methods:
The CRUD methodes: createRecord(), render() (=read), updateRecord() and deleteRecord()
rules() and $validationAttributes are used to validate the input in the modal and to show the correct error messages
setNewRecord() is used to:
reset the $newRecord array to its initial values when creating a new record
set the $newRecord array to the values of the record that needs to be updated when updating an existing record
reset the validation errors
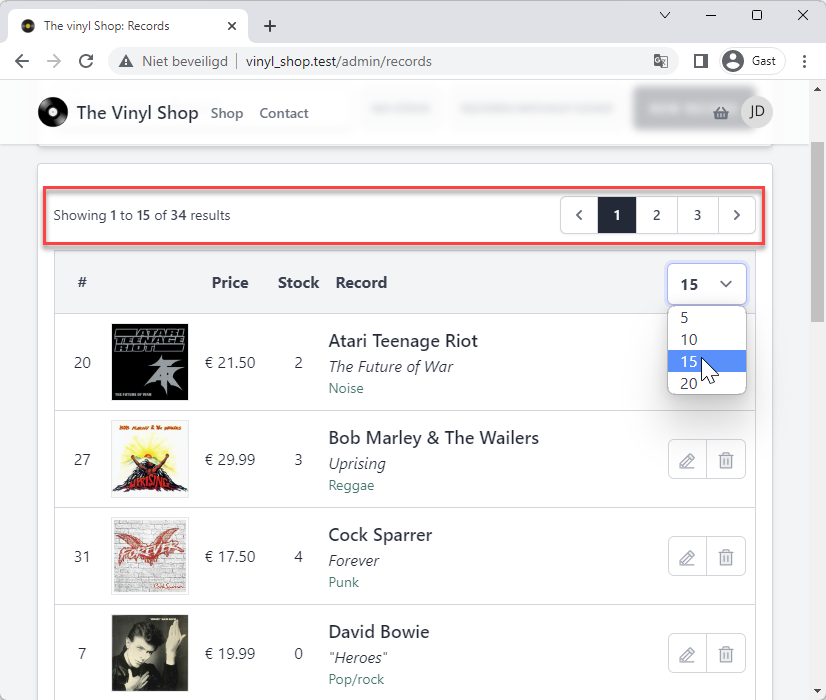
updated($propertyName, $propertyValue) will be used to reset the pagination when the $search, $noCover, $noStock or $perPage properties are updated
classRecordsextendsComponent{// filter and paginationpublic$search;public$noStock=false;public$noCover=false;public$perPage=5;// show/hide the modalpublic$showModal=false;// array that contains the values for a new or updated version of the recordpublic$newRecord=['id'=>null,'artist'=>null,'title'=>null,'mb_id'=>null,'stock'=>null,'price'=>null,'genre_id'=>null,'cover'=>'/storage/covers/no-cover.png',];// validation rules (use the rules() method, not the $rules property)protectedfunctionrules(){return[];}// validation attributesprotected$validationAttributes=[];// set/reset $newRecord and validationpublicfunctionsetNewRecord(){}// reset the paginatorpublicfunctionupdated($propertyName,$propertyValue){$this->resetPage();}// create a new recordpublicfunctioncreateRecord(){}// update an existing recordpublicfunctionupdateRecord(){}// delete an existing recordpublicfunctiondeleteRecord(){}publicfunctionrender(){returnview('livewire.admin.records')->layout('layouts.vinylshop',['description'=>'Manage the records of your vinyl shop','title'=>'Records',]);}}
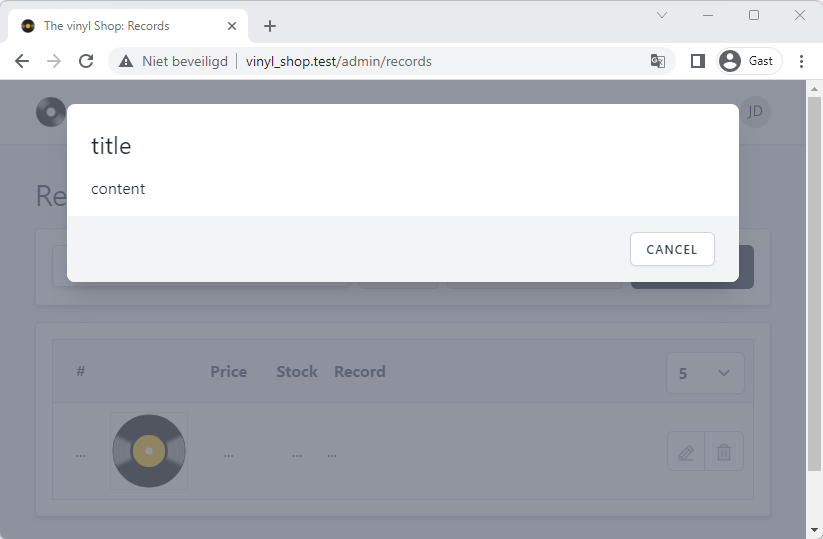
More specifically, it's a component that's build on top of a second component
Ctrl + click on the x-jet-dialog-modal tag to see the code of the first component
This component contains tree slots ($title, $content and $footer) that are wrapped in inside a x-jet-modal component
Ctrl + click on the x-jet-modal tag to see the code of the second component
The most important part of this component is show: @entangle($attributes->wire('model')).defer and Alpines x-show directive
This is where the connection between the modal and our $showModal property is made
Now we have two ways to hide the modal with the 'CANCEL' button in the footer of our modal
Using Livewire: <x-jet-secondary-button wire:click="$set('showModal', false)">Cancel</x-jet-secondary-button>
This is the slower way because it will first update the $showModal property on the backend and then the modal will be hidden on the frontend
Using Alpine: <x-jet-secondary-button @click="show = false">Cancel</x-jet-secondary-button>
This is the faster way because it will first hide the modal in the frontend, and then it will update the $showModal property on the backend
Add the @click="show = false" to the 'CANCEL' button in the footer of the modal and check the result
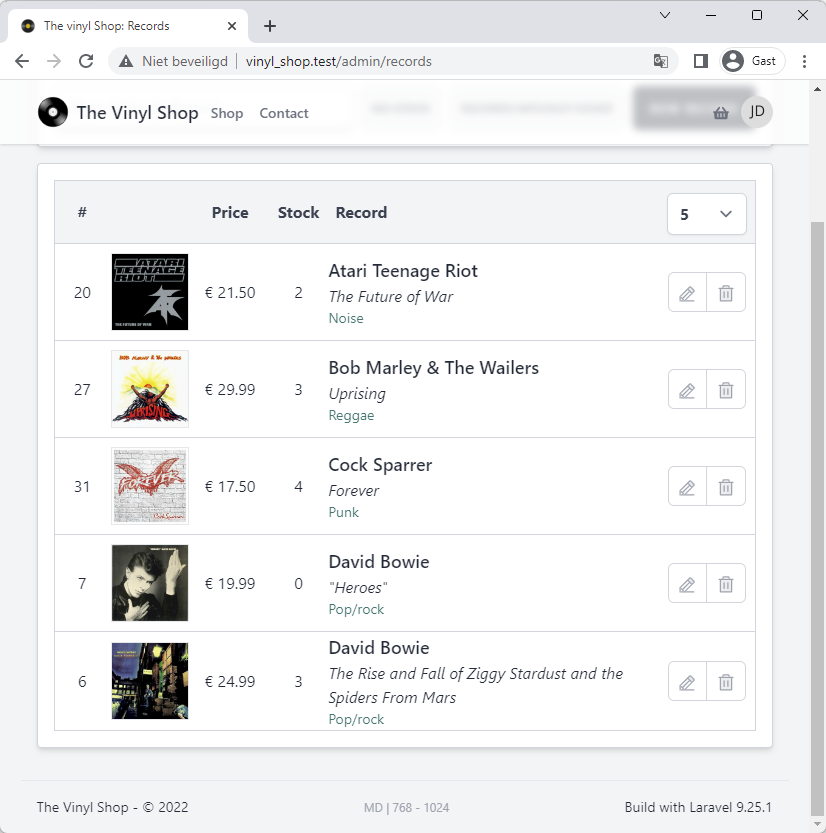
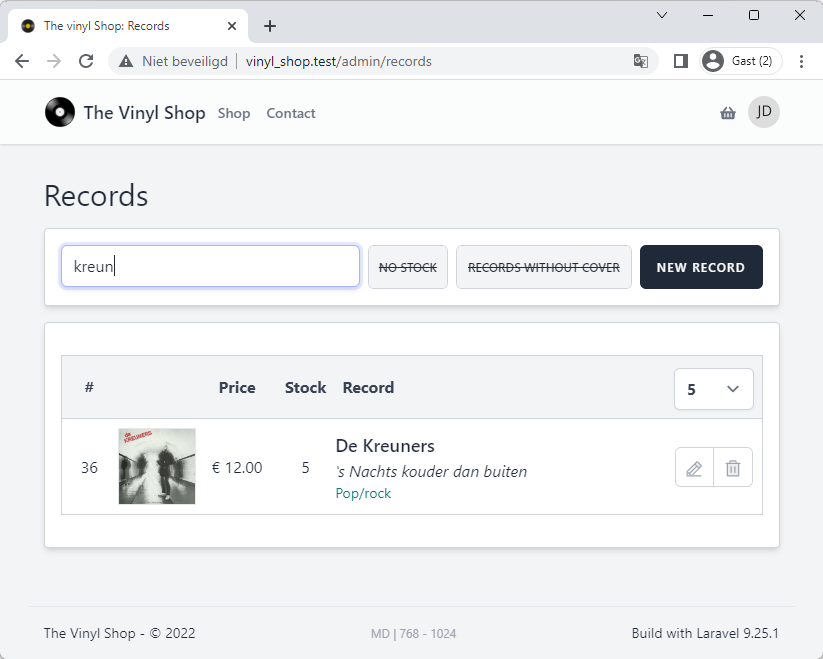
Line 13: get all the records from the database and order them by artist and title
Line 14: paginate the records
Line 15: send the records to the view
classRecordsextendsComponent{useWithPagination;...public$perPage=5;...publicfunctionrender(){$records= Record::orderBy('artist')->orderBy('title')->paginate($this->perPage);returnview('livewire.admin.records',compact('records'))->layout('layouts.vinylshop',['description'=>'Manage the records of your vinyl shop','title'=>'Records',]);}
Line 9 - 10: the $this->resetPage(); method will be called if one of the properties in the array changes
classRecordsextendsComponent{...// reset the paginatorpublicfunctionupdated($propertyName,$propertyValue){// reset if the $search, $noCover, $noStock or $perPage property has changed (updated)if(in_array($propertyName,['search','noCover','noStock','perPage']))$this->resetPage();}...}
Line 8: add the scope searchByArtistOrTitle(), that we made earlier in this course, to the query
classRecordsextendsComponent{...publicfunctionrender(){$records= Record::orderBy('artist')->orderBy('title')->searchTitleOrArtist($this->search)->paginate($this->perPage);returnview('livewire.admin.records',compact('records'))->layout('layouts.vinylshop',['description'=>'Manage the records of your vinyl shop','title'=>'Records',]);}...}
1 2 3 4 5 6 7 8 9 10 11 12 13 14 15 16 17
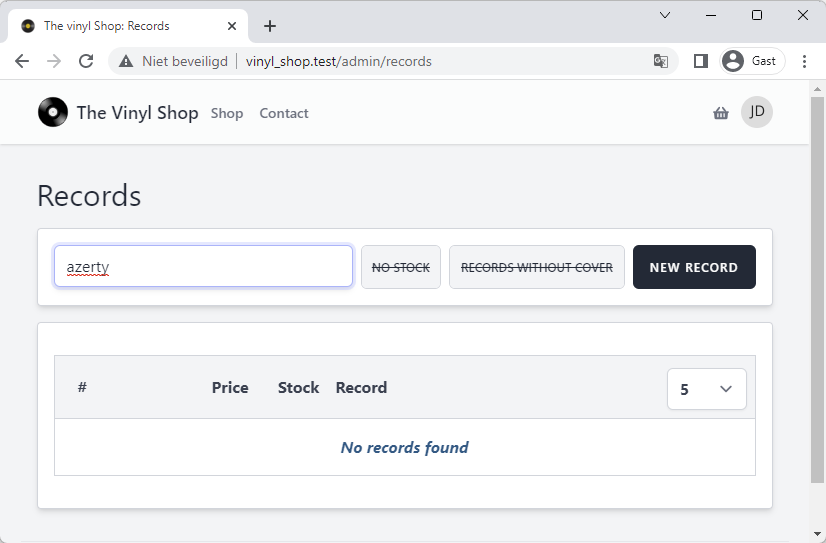
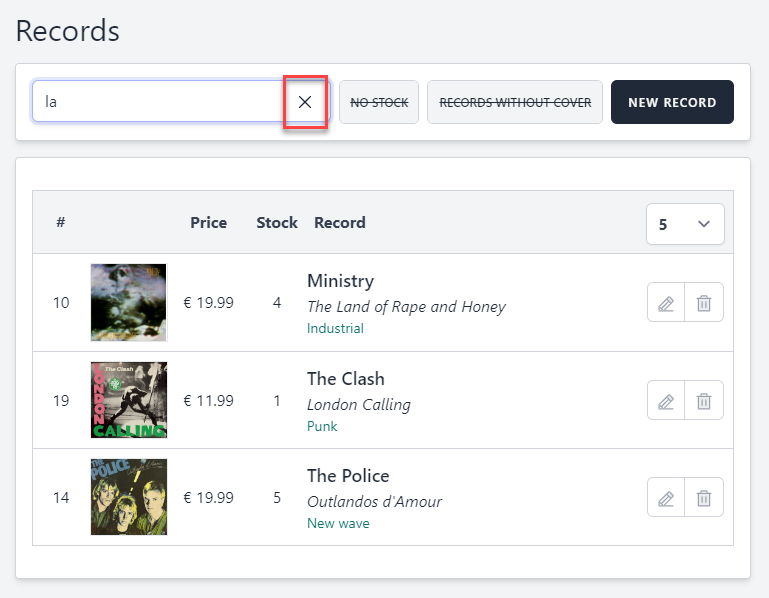
Line 3: bind the input element to the $search property
<div class="flex-1"><x-jet-input id="search" type="text" placeholder="Filter Artist Or Record"
wire:model.debounce.500ms="search"class="w-full shadow-md placeholder-gray-300"/>
1 2 3 4
This is the result of the search therm not mathcing match any records
(The table row between @empty and @endforelse is shown)
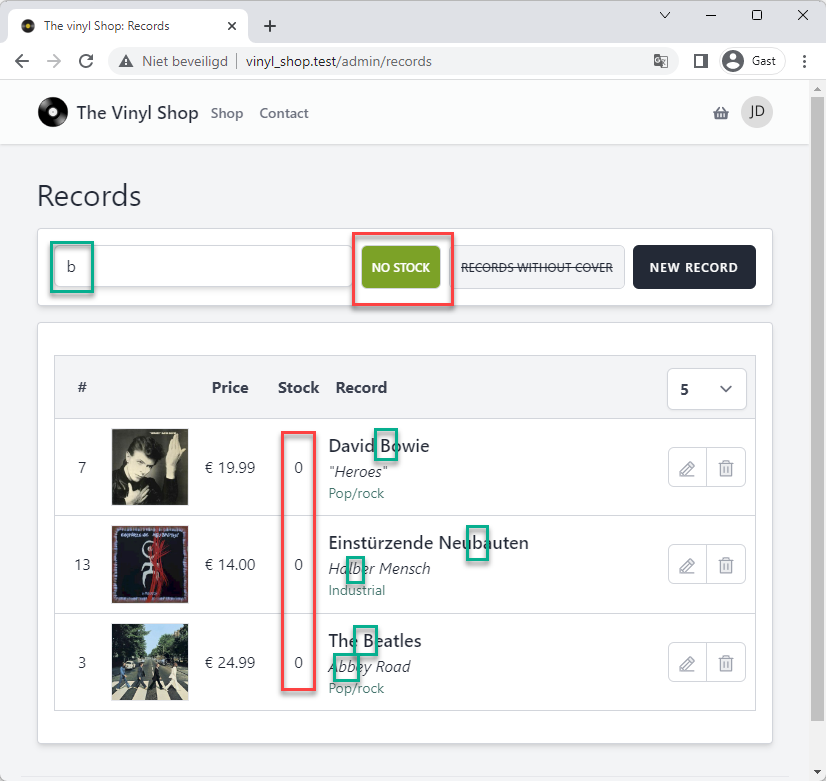
The <x-tmk.form.switch id="noStock" ... /> is just a wrapper around a checkbox
The state of this checkbox determines whether we should filter or not
If checked, filter the query further by ->where('stock', '=', 0)
If unchecked, skip this filter
Step 1
Because the $noStock filter is sometimes applied (whentrue or 1) and sometimes not (when falseor 0), we need to split the query in two parts
The result of the total query is exactly the same as before
classRecordsextendsComponent{...publicfunctionrender(){// filter by $search$query= Record::orderBy('artist')->orderBy('title')->searchTitleOrArtist($this->search);// paginate the $query$records=$query->paginate($this->perPage);returnview('livewire.admin.records',compact('records'))->layout('layouts.vinylshop',['description'=>'Manage the records of your vinyl shop','title'=>'Records',]);}}
1 2 3 4 5 6 7 8 9 10 11 12 13 14 15 16 17 18
Step 2
Now we can add a condition to the query, if the $noStock filter is true
classRecordsextendsComponent{...publicfunctionrender(){// filter by $search$query= Record::orderBy('artist')->orderBy('title')->searchTitleOrArtist($this->search);// only if $noCover is true, filter the query further, else, skip this stepif($this->noStock)$query->where('stock',false);// paginate the $query$records=$query->paginate($this->perPage);returnview('livewire.admin.records',compact('records'))->layout('layouts.vinylshop',['description'=>'Manage the records of your vinyl shop','title'=>'Records',]);}}
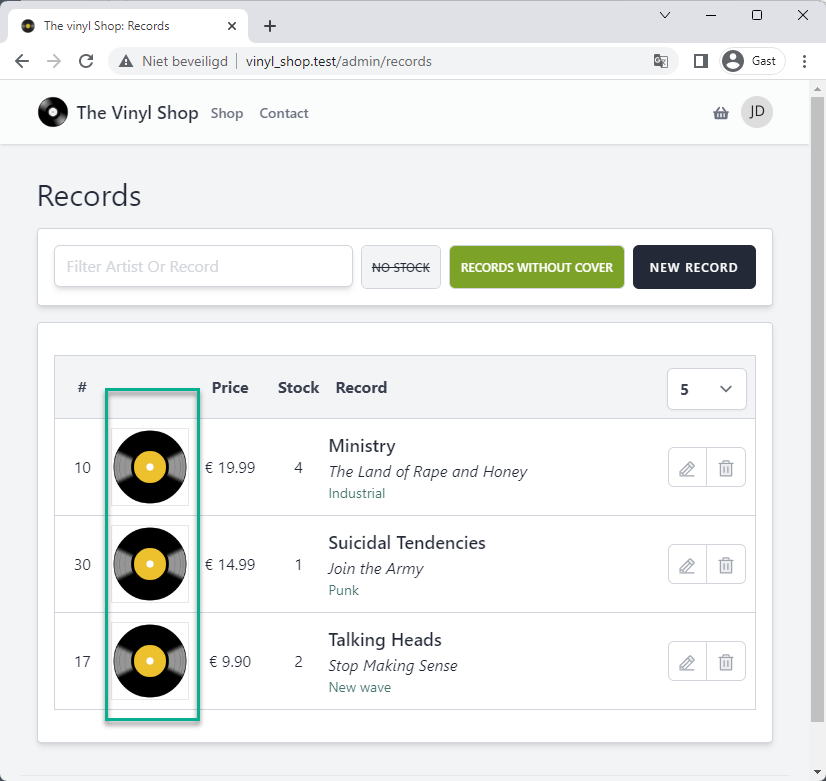
The <x-tmk.form.switch id="noCover" ... /> acts just the same as the switch for $noStock
(if true: filter, if false: skip filter)
The problem is that we don't have a column for the cover in the database!
Yes, we have a "generated" columncover, but this is only available AFTER the ->get() (or ->paginate()) method is called
So, we can't use this in our filter 😔
Wath we can do, is make a scope for this in the Record model and use it in our query
Open the model app/Models/Record.php
Add a new scope that returns only records when there is no cover available in the public/storage/covers folder
Line 10: use the pluck() method(opens new window) to fill the $mb_ids array with the mb_id values IMPORTANT: ONLY the result from the previous query is used in this scope!
(e.g. im_dbs = ['fcb78d0d-8067-4b93-ae58-1e4347e20216', 'd883e644-5ec0-4928-9ccd-fc78bc306a46', ...])
Line 12: initialize an empty array $covers
Line 13 - 23: loop through the $mb_ids array and check if the cover exists in the public/storage/covers folder
Depending on the state of the $exists filter, the mb_id is added to the $covers array
Line 25: whereIn()(opens new window) returns only the records where it's mb_id value is available in the $covers array
IMPORTANT:
open the menu Laravel > Generate Helper Code to add the new scope for type hinting and auto-completion in PhpStorm
...publicfunctionscopeMaxPrice($query,$price){...}publicfunctionscopeSearchTitleOrArtist($query,$search='%'){...}publicfunctionscopeCoverExists($query,$exists=true){// make an array with all the mb_id attributes$mb_ids=$query->pluck('mb_id');// empty array to store 'mb_id's that have a cover$covers=[];foreach($mb_idsas$mb_id){// $exists = true: if the cover exists, add the mb_id to the $covers array// $exists = false: if the cover does not exist, add the mb_id to the $covers arrayif($exists){if(Storage::disk('public')->exists('covers/'.$mb_id.'.jpg'))$covers[]=$mb_id;}else{if(!Storage::disk('public')->exists('covers/'.$mb_id.'.jpg'))$covers[]=$mb_id;}}// return only the records with the mb_id in the $covers arrayreturn$query->whereIn('mb_id',$covers);}
if the $noCover filter is true, add the scope CoverExists() to the query
classRecordsextendsComponent{...publicfunctionrender(){// filter by $search$query= Record::orderBy('artist')->orderBy('title')->searchTitleOrArtist($this->search);// only if $noCover is true, filter the query further. else, skip this stepif($this->noStock)$query->where('stock',false);// only if $noCover is true, filter the query further. else, skip this stepif($this->noCover)$query->coverExists(false);// paginate the $query$records=$query->paginate($this->perPage);returnview('livewire.admin.records',compact('records'))->layout('layouts.vinylshop',['description'=>'Manage the records of your vinyl shop','title'=>'Records',]);}}
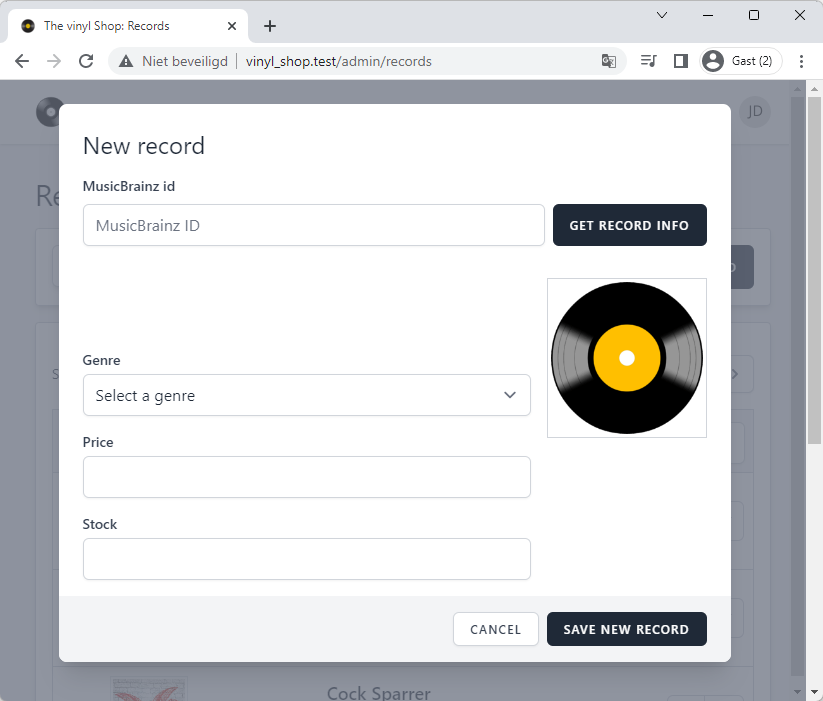
We need: the title of the record, the artist and the cover (if there is one)
These fields are not editable, except for the cover later in this course
We also need the price of the record, how many items are in stock and the genre this record belongs to
These fields are editable and don't have anything to do with the MusicBrainz API
Some examples on how the extract the data that we need from the JSON response:
title and artist (hidden inputs because they are not editable)
genre (select input with all the genres)
price and stock (number inputs)
Get all the genres
We need to get all the genres from the database and put them in a select input
Because this list don't change while we are on this page, we can get it once (use the mount() methode for this, not the render() methode) and store it in a new $genres property
classRecordsextendsComponent{public$genres;...// get all the genres from the database (runs only once)publicfunctionmount(){$this->genres= Genre::orderBy('name')->get();}publicfunctionrender(){...}}
1 2 3 4 5 6 7 8 9 10 11 12 13 14
Now we can populate the modal
Update the setNewRecord() methode
classRecordsextendsComponent{...// set/reset $newRecord and validationpublicfunctionsetNewRecord(){$this->resetErrorBag();$this->reset('newRecord');$this->showModal=true;}...}
1 2 3 4 5 6 7 8 9 10 11 12 13 14 15
Step 1
Add wire:click="setNewRecord()" to the new record button
Line 7 - 44: add the form fields to the content slot
Line 13: this button will call the getDataFromMusicbrainzApi() method to get the data from the Musicbrainz API (not implemented yet)
Line 20, 22, 24: if the value is empty, add a non-breaking-space ( ) to make sure that we don't break the lay-out and lower input fields are always on the same height
Line 48 - 52: this button stores the data in the database and closes the modal
The price and stock fields must be a number and can't be negative
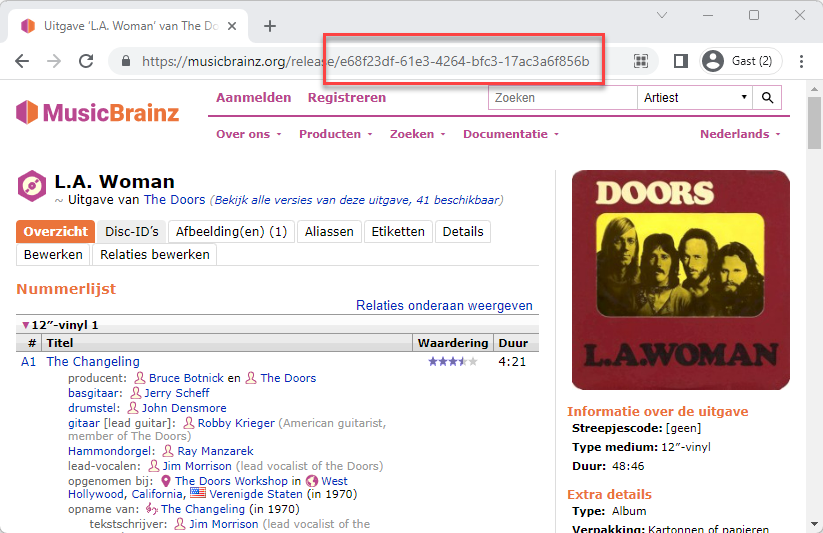
Line 19 - 21: add a new getDataFromMusicbrainzApi() method to fetch the Musicbrainz API
For now, we just validate the $newRecord property to test our validation rules
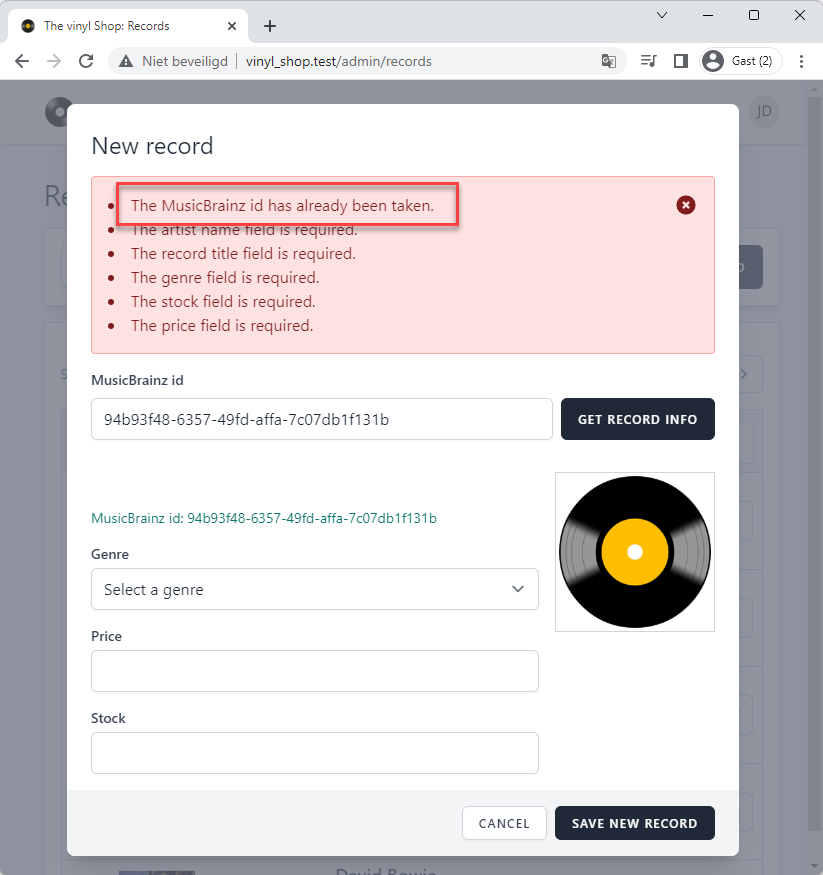
classRecordsextendsComponent{...// validation rules (use the rules() method, not the $rules property)protectedfunctionrules(){return['newRecord.mb_id'=>'required|size:36|unique:records,mb_id,'.$this->newRecord['id'],'newRecord.artist'=>'required','newRecord.title'=>'required','newRecord.genre_id'=>'required|exists:genres,id','newRecord.stock'=>'required|numeric|min:0','newRecord.price'=>'required|numeric|min:0',];}// get artist, title and cover from the MusicBrainz APIpublicfunctiongetDataFromMusicbrainzApi(){$this->validate();}...}
Line 8: replace $this->validate() with $this->validateOnly('newRecord.mb_id')
Line 9: reset the error bag
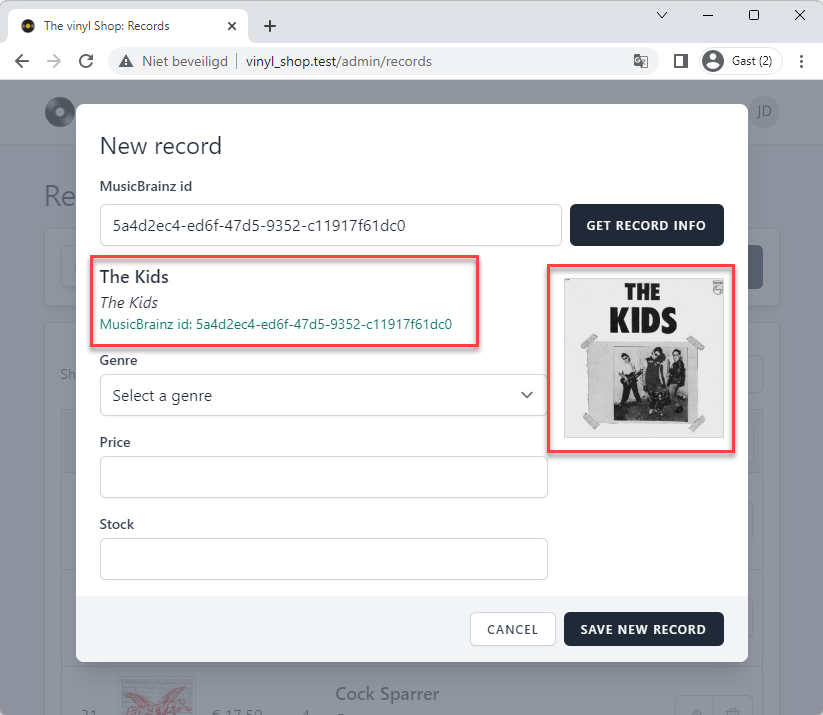
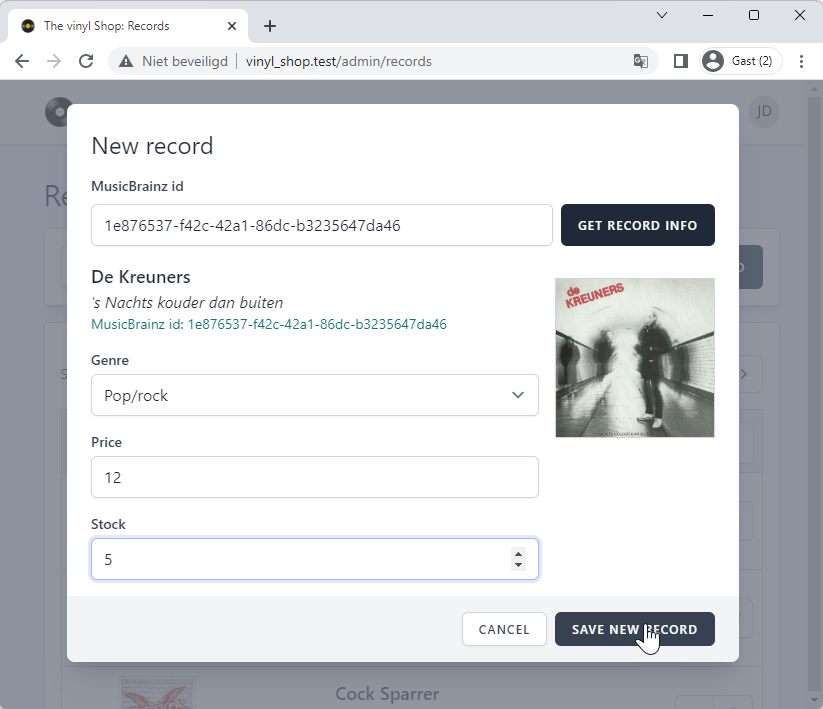
Line 10: try to fetch the data from the MusicBrainz API
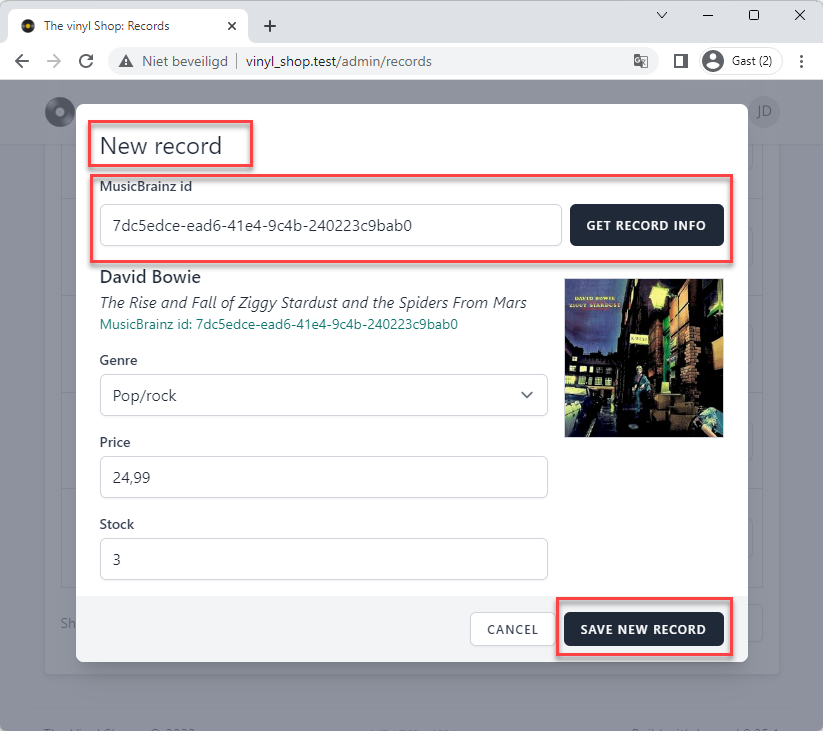
Line 11 - 17: the API call was successful:
update the artist, title and cover properties with the data from the API
Line 18 - 23: the API call failed:
reset the artist, title and cover properties to their original state
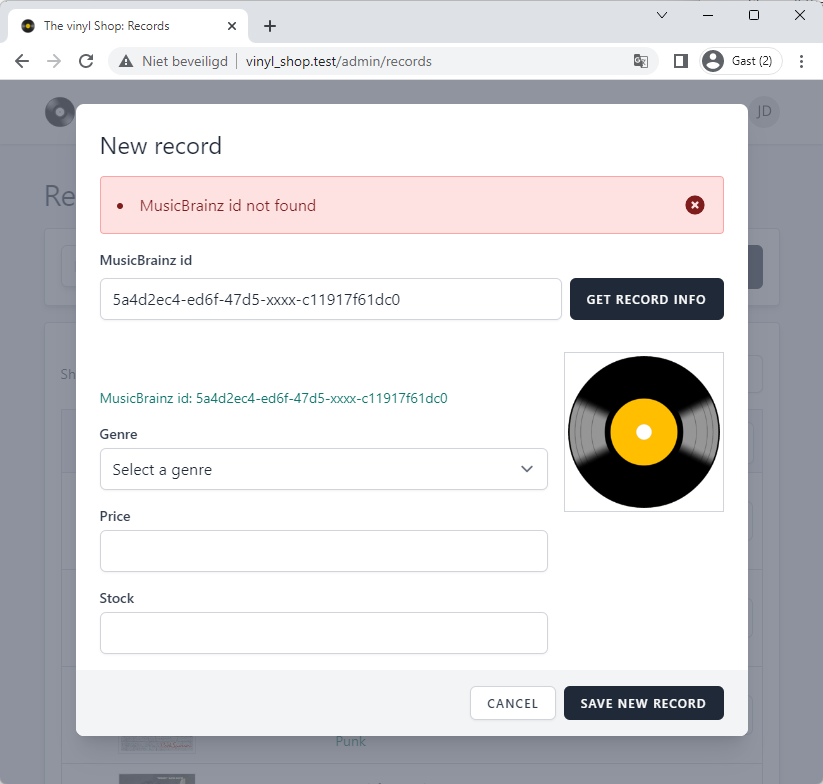
Line 22: create a custom error message for the mb_id field
classRecordsextendsComponent{...// get artist, title and cover from the MusicBrainz APIpublicfunctiongetDataFromMusicbrainzApi(){$this->validateOnly('newRecord.mb_id');$this->resetErrorBag();$response= Http::get('https://musicbrainz.org/ws/2/release/'.$this->newRecord['mb_id'].'?inc=artists&fmt=json');if($response->successful()){$data=$response->json();$this->newRecord['artist']=$data['artist-credit'][0]['artist']['name'];$this->newRecord['title']=$data['title'];if($data['cover-art-archive']['front']){$this->newRecord['cover']='https://coverartarchive.org/release/'.$this->newRecord['mb_id'].'/front-250.jpg';}}else{$this->newRecord['artist']=null;$this->newRecord['title']=null;$this->newRecord['cover']='/storage/covers/no-cover.png';$this->addError('newRecord.mb_id','MusicBrainz id not found');}}...}
Storage::disk('public') will save the image to the public disk
->put('covers/' . $this->newRecord['mb_id'] . '.jpg', $originalCover) will save the image to the covers folder with the name mb_id value and the extension .jpg
classRecordsextendsComponent{...// get artist, title and cover from the MusicBrainz APIpublicfunctiongetDataFromMusicbrainzApi(){$this->validateOnly('newRecord.mb_id');$this->resetErrorBag();$response= Http::get('https://musicbrainz.org/ws/2/release/'.$this->newRecord['mb_id'].'?inc=artists&fmt=json');if($response->successful()){$data=$response->json();$this->newRecord['artist']=$data['artist-credit'][0]['artist']['name'];$this->newRecord['title']=$data['title'];if($data['cover-art-archive']['front']){$this->newRecord['cover']='https://coverartarchive.org/release/'.$this->newRecord['mb_id'].'/front-250.jpg';$originalCover= Image::make($this->newRecord['cover'])->encode('jpg',75);
Storage::disk('public')->put('covers/'.$this->newRecord['mb_id'].'.jpg',$originalCover);}}else{...}}...}
Now that we have all the data we need, we can save the record to the database
Line 8: validate if all the required fields are filled in
Line 9 - 16: create a new record with the data from the $newRecord properties
Line 17: hide the modal
Line 18 - 21: show a success toast message
classRecordsextendsComponent{// create a new recordpublicfunctioncreateRecord(){$this->validate();$record= Record::create(['mb_id'=>$this->newRecord['mb_id'],'artist'=>$this->newRecord['artist'],'title'=>$this->newRecord['title'],'stock'=>$this->newRecord['stock'],'price'=>$this->newRecord['price'],'genre_id'=>$this->newRecord['genre_id'],]);$this->showModal=false;$this->dispatchBrowserEvent('swal:toast',['background'=>'success','html'=>"The record <b><i>{$record->title} from {$record->artist}</i></b> has been added",]);}...}
Line 6: replace setNewRecord() with setNewRecord(Record $record = null) to use route model binding with a default value of null
When we update the record with id 6, the setNewRecord(6) method will be called and all the information of that record is available in the $record variable
When we create a new record, the setNewRecord() method will be called and the $record variable will be null
Line 9 - 20: the if statement is true when we want to edit a record
Update the $newRecord properties with the values of the record
Line 17 - 20: check if the cover exists in the storage/covers folder:
cover exists: set the cover property to the path of the cover e.g. storage/covers/7dc5edce-ead6-41e4-9c4b-240223c9bab0.jpg
cover doesn't exist: set the cover property to the default cover image /storage/covers/no-cover.png
Line 22: the if statement is false when we want to create a new record
Reset the $newRecord properties to their original state
classRecordsextendsComponent{...// set/reset $newRecord and validationpublicfunctionsetNewRecord(Record $record=null){$this->resetErrorBag();if($record){$this->newRecord['id']=$record->id;$this->newRecord['artist']=$record->artist;$this->newRecord['title']=$record->title;$this->newRecord['mb_id']=$record->mb_id;$this->newRecord['stock']=$record->stock;$this->newRecord['price']=$record->price;$this->newRecord['genre_id']=$record->genre_id;$this->newRecord['cover']=
Storage::disk('public')->exists('covers/'.$record->mb_id.'.jpg')?'/storage/covers/'.$record->mb_id.'.jpg':'/storage/covers/no-cover.png';}else{$this->reset('newRecord');}$this->showModal=true;}...}
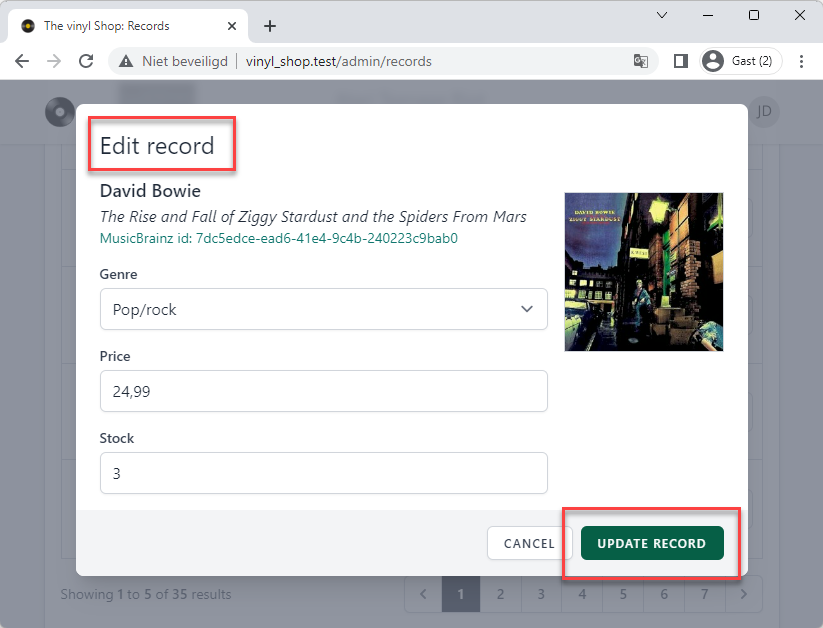
Line 6: use route model binding to get the record to update
Line 8: validate if all the required fields are filled in
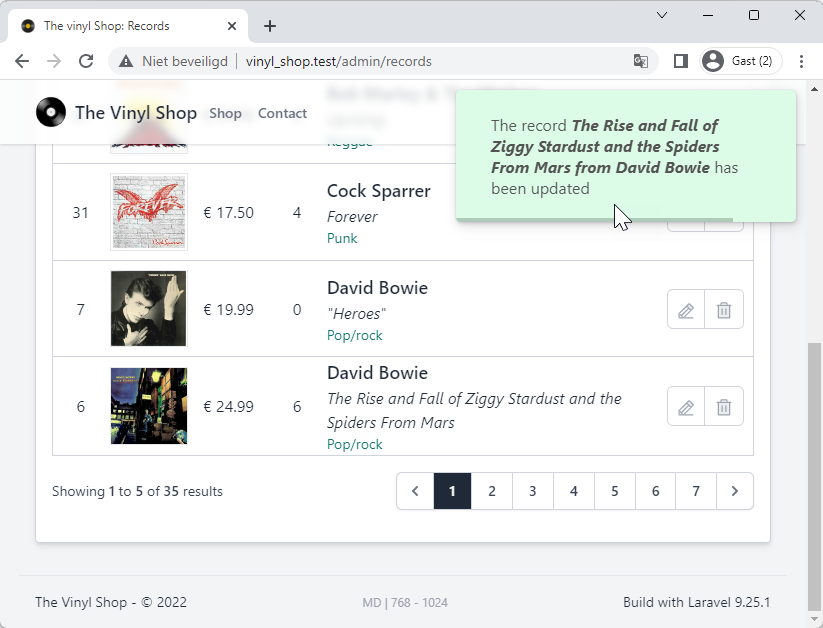
Line 9 - 16: update the record with the data from the $newRecord properties
Line 17: hide the modal
Line 18 - 21 show a success toast message
classRecordsextendsComponent{...// update an existing recordpublicfunctionupdateRecord(Record $record){$this->validate();$record->update(['mb_id'=>$this->newRecord['mb_id'],'artist'=>$this->newRecord['artist'],'title'=>$this->newRecord['title'],'stock'=>$this->newRecord['stock'],'price'=>$this->newRecord['price'],'genre_id'=>$this->newRecord['genre_id'],]);$this->showModal=false;$this->dispatchBrowserEvent('swal:toast',['background'=>'success','html'=>"The record <b><i>{$record->title} from {$record->artist}</i></b> has been updated",]);}...}
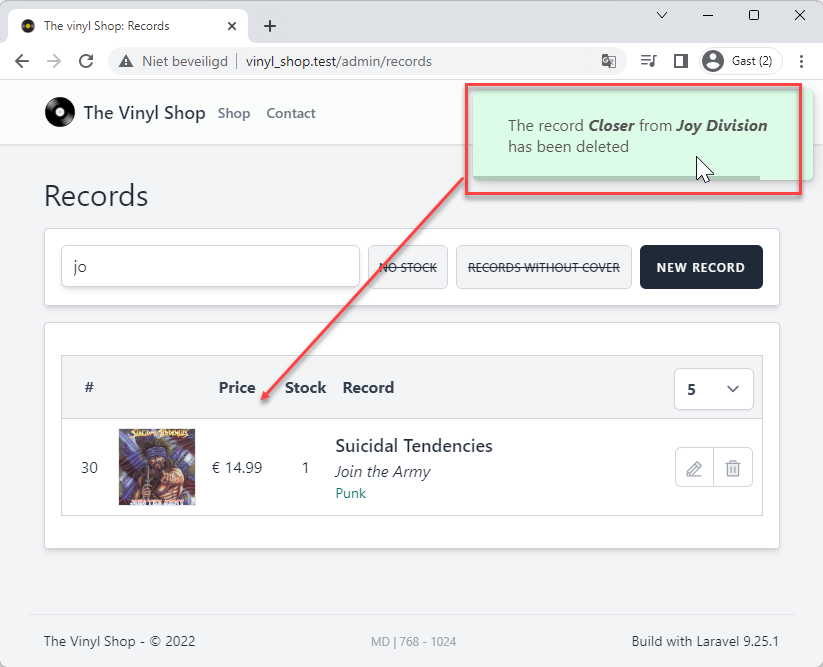
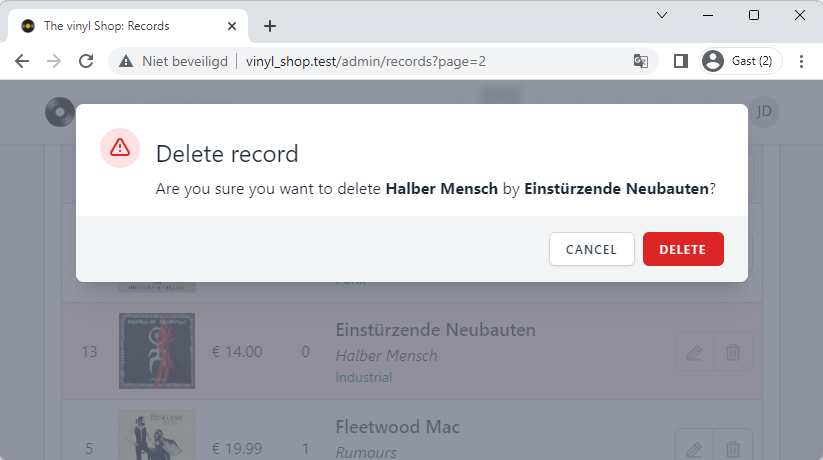
Line 6: use route model binding to get the record to delete
Line 8: delete the record
Line 9 - 12: show a success toast message
classRecordsextendsComponent{...// delete an existing recordpublicfunctiondeleteRecord(Record $record){$record->delete();$this->dispatchBrowserEvent('swal:toast',['background'=>'success','html'=>"The record <b><i>{$record->title} from {$record->artist}</i></b> has been deleted",]);}...}