# Laravel 9 project
WARNING
Please make sure you have installed PHP 8.1.x and NOT PHP 7.4.x otherwise you will end up with Composer errors at the end of this installation and not the landing page for our vinyl shop!
# Start a new project
# Make a new Laravel 9 project
- Go to the folder C:\sites_laravel and open Git Bash
- Start a new project where vinyl_shop is the folder of your new project and specify the desired (major) version of Laravel:
composer create-project --prefer-dist laravel/laravel:^9 vinyl_shop
WARNING - Git Bash
Make sure to create the vinyl_shop project with the Git Bash as we've noticed some version irregularities with other terminals
# Install the necessary dependencies
- Go inside the folder C:\sites_laravel\vinyl_shop:
cd vinyl_shop
# Blade icons
- We will use the Blade UI kit Icons (opens new window) to easily make use of a variety of SVG icons in our views
- We install only the Fontawesome icon, Simple icon, Phosphor icon and Hero icon icon packages:
(If these three sets are not enough, you can always install additional icon packages (opens new window)) - Run the command
composer require blade-ui-kit/blade-iconsto add the Blade UI kit Icons (opens new window) package - Run the command
composer require owenvoke/blade-fontawesome codeat3/blade-simple-icons codeat3/blade-phosphor-icons blade-ui-kit/blade-heroiconsto add the four icon packages
IMPORTANT NOTE ABOUT BLADE UI KIT ICONS!
- The more packages you install, the slower the application will become!
To solve this issue, you must enable caching for the icons with the commandphp artisan icons:cache - This command will generate a bootstrap/cache/blade-icons.php file that contains a manifest of all the icons that are currently installed
- If you want to install additional icon packages, you must run the command
php artisan icons:clearto clear the cache, install the new icon packag(es) and run the commandphp artisan icons:cacheagain to generate a new manifest file
# Intervention Image
- The Intervention Image package (opens new window) is an open source PHP image handling and manipulation library that we will use to upload images (record covers) in our webserver
- Run the command
composer require intervention/imageto install the Intervention Image package- After you have installed Intervention Image, open the Laravel config file config/app.php and add the following lines:
- Line 11: in the
providersarray add the service provider for this package: - Line 22: in the
aliasesarray add the facade for this package:
'providers' => [

    /*
     * Laravel Framework Service Providers...
     */
    ....

    /*
     * Package Service Providers...
     */
    Intervention\Image\ImageServiceProvider::class,

    /*
     * Application Service Providers...
     */
    ....
]

/* ... */

'aliases' => Facade::defaultAliases()->merge([
    'Image' => Intervention\Image\Facades\Image::class
])->toArray(),
1
2
3
4
5
6
7
8
9
10
11
12
13
14
15
16
17
18
19
20
21
22
23 - Line 11: in the
- After you have installed Intervention Image, open the Laravel config file config/app.php and add the following lines:
# Jetstream Authentication
- Run the command
composer require laravel/jetstream:^2to scaffold authentication views and routes with Jetstream (opens new window)- Install the Livewire + Blade stack:
php artisan jetstream:install livewire - Run
php artisan storage:linkto create a symlink (opens new window) in the public folder to allow images to be uploaded/served by the application - Run
npm install && npm run devto complete the installation
- Install the Livewire + Blade stack:
# Laravel Debugbar
- The Laravel Debugbar (opens new window) is a PHP Debug Bar that provides a better debug experience for the Laravel framework
- Run the command
composer require barryvdh/laravel-debugbar --devto install the Laravel Debugbar package
# Configure Homestead
- Update the file C:\vagrant\homestead\Homestead.yaml
- Map the public folder of your new project
sites:
  - map: homestead.test
    to: /home/vagrant/code    # change this line (remove /public)
    php: "8.1"                # run this site with PHP 8.1.x
  - map: phpmyadmin.test
    to: /home/vagrant/code/phpMyAdmin
    php: "8.1"
  - map: vinyl_shop.test
    to: /home/vagrant/code/vinyl_shop/public
    php: "8.1"
1
2
3
4
5
6
7
8
9
10- Create a new vinylshop database
databases:
  - homestead
  - vinylshop
1
2
3 - Add the new test domain to your hosts file C:\Windows\System32\drivers\etc\hosts:
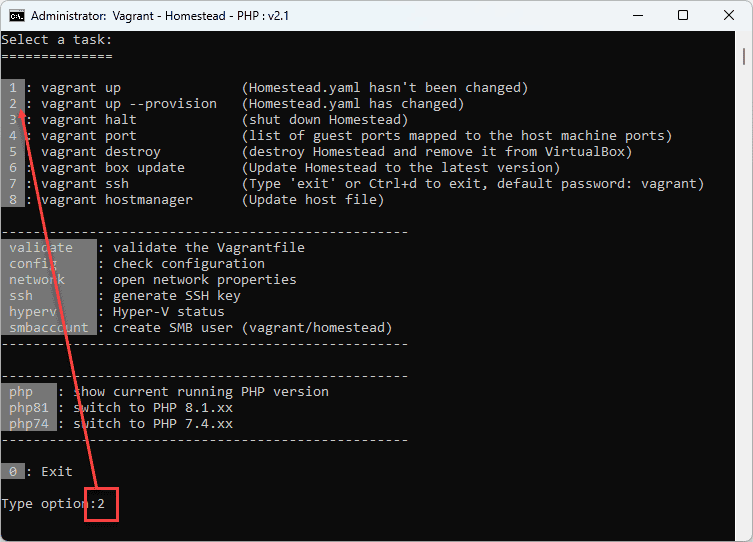
192.168.56.56 vinyl_shop.test - (Re)start Homestead: use option 2 in laravel.bat
# Configure PhpStorm
- Open this project in PhpStorm
- Wait until the project is fully indexed (opens new window)! (See bottom right of editor)
- Switch the PHP to version: 8.1 AFTER indexing is completed (Navigate to composer.json and change the PHP version there)

# Laravel Idea plugin
- Laravel support is provided by means of the Laravel Idea plugin (opens new window) (Free to install with your JetBrains student account)
- Open https://plugins.jetbrains.com/ (opens new window) and login with your Thomas More account
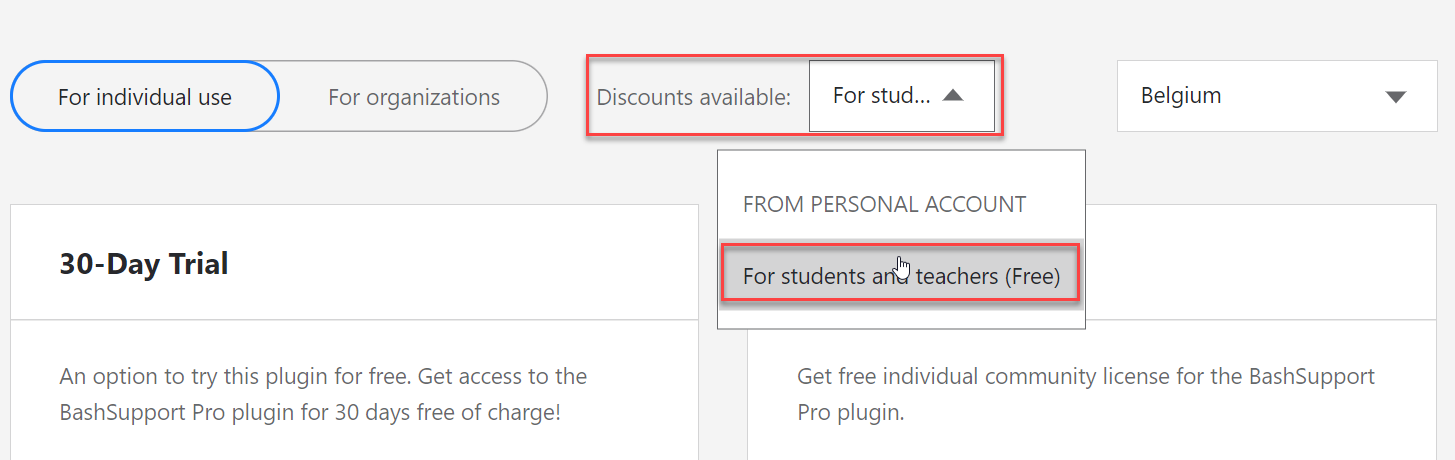
- Search for Laravel Idea and click on Buy
- Select the free version from the dropdown menu and click on Apply
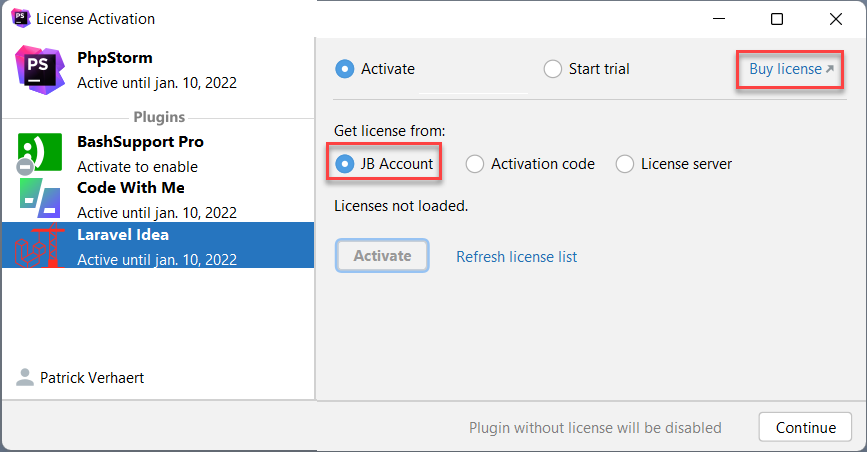
- Install the plugin in PhpStorm

- Restart PhpStorm and activate the plugin
- Open menu Laravel -> Generate Helper Code... to update code completion
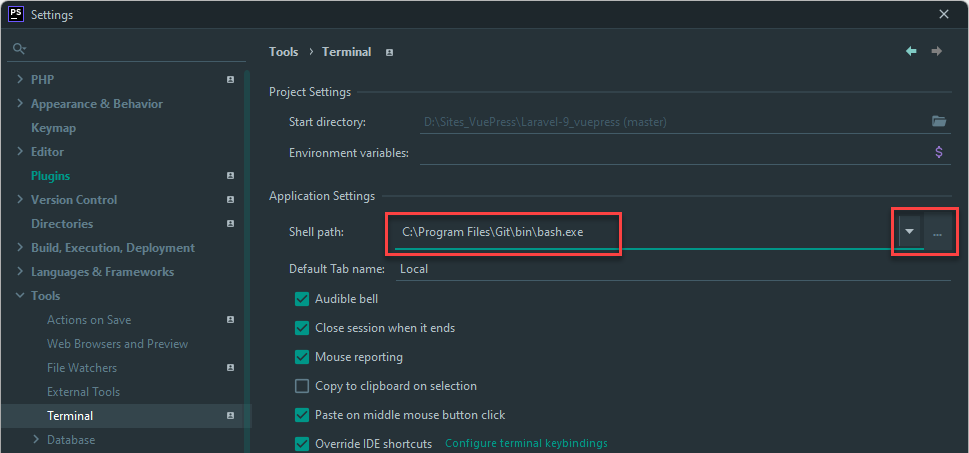
# Set (Git) bash as the default terminal
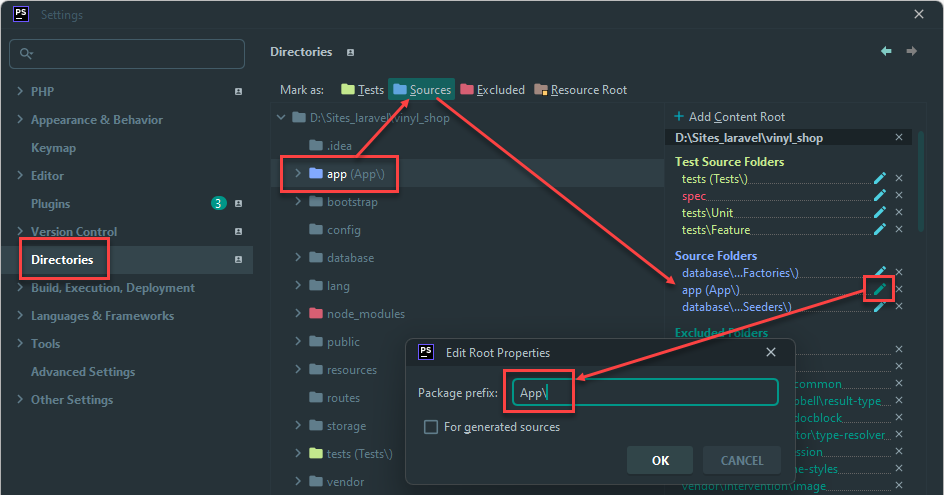
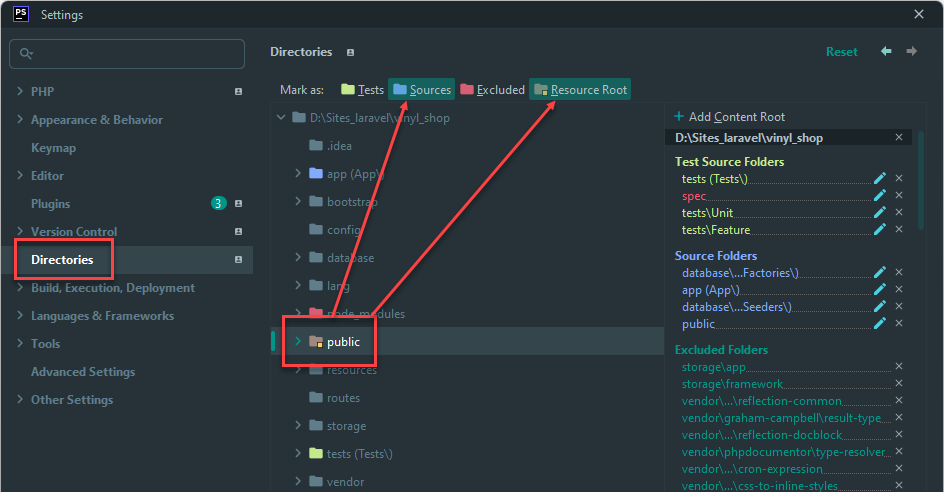
# Configure the (source) directories
- Configure the following Directories in PhpStorm
- If necessary: set app as Sources and prefix it with App\
- Set public as Sources
- Set public as Resource Root
# Change default project settings
# config/app.php
# Update timezone
- If you create a new Laravel application, you may notice that all created_at and other timestamp fields in the database are being saved in UTC timezone
- Open the Laravel project file config/app.php and look for this entry
'timezone' => 'UTC', - Change the default timezone (
UTC) to your local timezone (opens new window), i.e.Europe/Brussels
/*
|--------------------------------------------------------------------------
| Application Timezone
|--------------------------------------------------------------------------
|
| Here you may specify the default timezone for your application, which
| will be used by the PHP date and date-time functions. We have gone
| ahead and set this to a sensible default for you out of the box.
|
*/

'timezone' => 'Europe/Brussels',
1
2
3
4
5
6
7
8
9
10
11
12
2
3
4
5
6
7
8
9
10
11
12
# .env
- Open the Laravel project file .env which contains all the environment variables
# Name and URL settings
- Change APP_NAME to
"The Vinyl Shop"(Quotes are required if a value in the .env-file contains spaces!) - Change APP_URL to
http://vinyl_shop.test/
APP_NAME="The Vinyl Shop"
APP_ENV=local
APP_KEY=base64:NSKiPfWcKekv2PxLEnJO3xl7JCKmyEt5E881v1EPrnA=
APP_DEBUG=true
APP_URL=http://vinyl_shop.test/
1
2
3
4
5
2
3
4
5
# Debugbar settings
- Add DEBUGBAR_ENABLED=false to the .env file
APP_NAME="The Vinyl Shop"
APP_ENV=local
APP_KEY=base64:NSKiPfWcKekv2PxLEnJO3xl7JCKmyEt5E881v1EPrnA=
APP_DEBUG=true
APP_URL=http://vinyl_shop.test/

DEBUGBAR_ENABLED=false
1
2
3
4
5
6
7
2
3
4
5
6
7
TIP
- If you want to enable the Laravel Debugbar, set DEBUGBAR_ENABLED=true
- Once enabled, you can access the Debugbar by clicking on the Debugbar button in the bottom right corner of the browser window
- After you are done debugging, set DEBUGBAR_ENABLED=false again
# Database settings
- Change the database configuration
DB_CONNECTION=mysql
DB_HOST=localhost           # change to localhost, try 127.0.0.1 or 192.168.56.56 if localhost doesn't work
DB_PORT=33060               # add a zero or change to 2200 (see remarks)
DB_DATABASE=vinylshop       # change to vinylshop
DB_USERNAME=homestead       # change to homestead
DB_PASSWORD=secret          # change to secret
1
2
3
4
5
6
2
3
4
5
6
REMARKS
- If the changes in the .env file are not immediately visible, clear the config cache with the command
php artisan config:clearorphp artisan optimize:clear - If you still have problems, try to restart Homestead
# Database migration
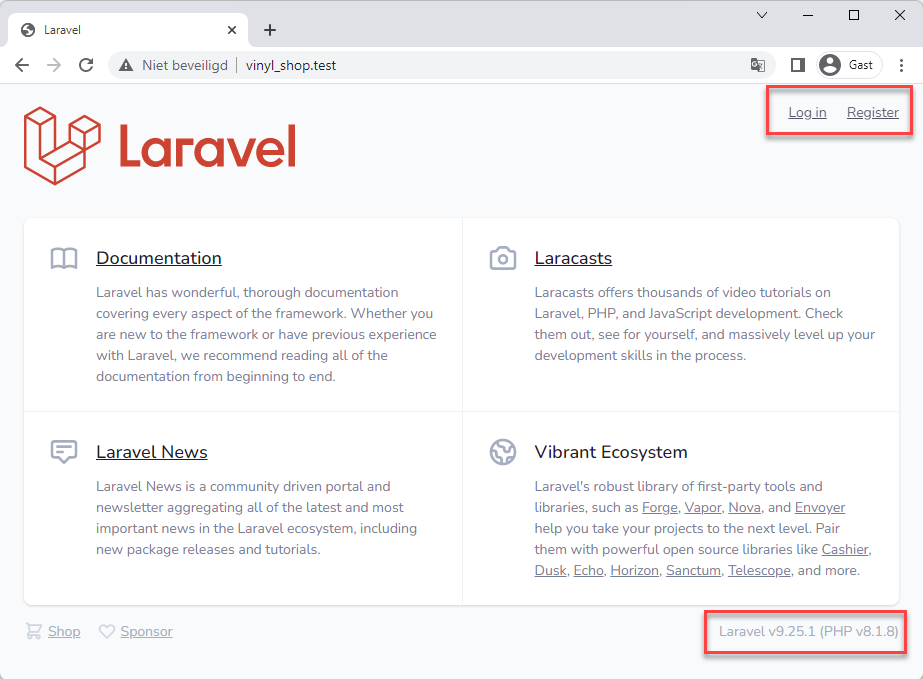
- Migrate the database with the command
php artisan migrate - Browse to the project via the URL http://vinyl_shop.test (opens new window)
# Install some Chrome extensions
- JSON Viewer Pro (opens new window): makes JSON easy to read.
- Tailwind Devtools (opens new window): a sidebar pane for Tailwind CSS classes.
- Livewire Devtools (opens new window): for debugging Livewire applications.
- Fake Filler (opens new window): a form filler that fills all inputs on a page with fake/dummy data.
# Update an existing project (optional)
- To update an existing project to the latest (backwards compatible) Laravel version (for example the latest version of Laravel 9), use the command
composer updatein a (Git Bash) terminal within the project folder
TIP
To check the version of a Laravel project, open a (Git Bash) terminal inside the project folder and use the command
php artisan --version (or php artisan about for more details about the project)
C:\sites_laravel\vinyl_shop> php artisan --version
Laravel Framework 9.27.0
1
2
2
# Localisation (optional)
- You have a non-English website or a multilingual website?
Then you can use the laravel-lang package to make your website multilingual - Install the required translation packages with the command:
composer require laravel-lang/lang laravel-lang/publisher laravel-lang/attributes --dev
1
- The next step is to publish the translation files for the languages you want to use
- For example, to publish the Dutch translation files, use the command:
php artisan lang:add nl
1
- More information about the Laravel Localization can be found in the Config -> Localization section