# Basic routing & views
# Basic routing
- The file routes/web.php contains all the routes (opens new window) that you want to visit (or get) through a browser
- When a user visits the home page http://vinyl_shop.test (opens new window) of the application (indicated by
'/'), the Laravel 'welcome' view is shown
Route::get('/', function () {
    return view('welcome');
});
1
2
3
2
3
REMARKS
- In this first piece of code, we already encounter facades and helper functions, two very important features of Laravel
- In the statement
Route::get(...), it looks like a static methodget()of a classRouteis called. However,Routeis not an ordinary PHP class, but a Laravel facade.
Facades (opens new window) are special Laravel classes that provide easy access to lots of Laravel features with static method calls. A detailed understanding of this architectural concept is beyond the scope of this course. Remember for now that a facade acts like a proxy: when the statementRoute::get(...)is executed, an object of a specific class linked to theRoutefacade (in this case \vendor\laravel\framework\src\Illuminate\Routing\Router.php) is initiated behind the scenes, and the methodget()is called (on this object) in a non-static way. - The
view()function is one of the numerous Laravel helper functions (opens new window). The function retrieves an instance of the view specified in the function argument.
- In the statement
- Change the code and the project home page gets adjusted
Route::get('/', function () {
    //return view('welcome');
    return 'The Vinyl Shop';
});
1
2
3
4
2
3
4

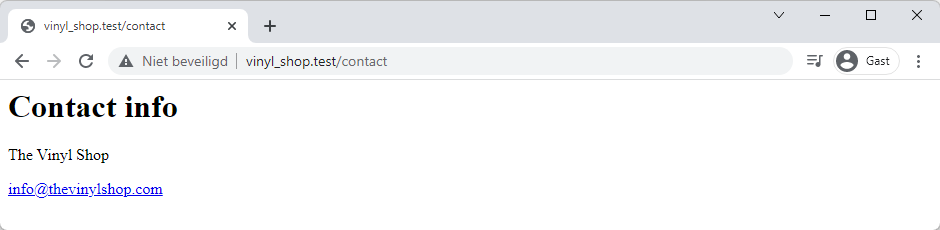
- Add a new route to the URL http://vinyl_shop.test/contact (opens new window) and show some contact information
Route::get('contact', function () {
    return 'Contact info';
});
1
2
3
2
3

# Basic Blade views
- Blade views (opens new window) correspond to the HTML (styled with CSS) that gets rendered in the browser
- Views are stored in the folder resources/views
- The view 'welcome' (called in the route to the home page) corresponds to the file welcome.blade.php
- Blade (opens new window) is the templating engine (shipped with Laravel) that will be covered (extensively) further on in this course
NAMING CONVENTIONS
All views in Laravel must have the extension .blade.php
- Make a new view contact.blade.php in the folder resources/views with some basic HTML code
<h1>Contact info</h1>

<p>The Vinyl Shop</p>
<p><a href="mailto:info@thevinylshop.com">info@thevinylshop.com</a></p>
1
2
3
4
2
3
4
- Adjust the 'contact' route in the file routes/web.php
Route::get('contact', function () {
    // return 'Contact info';
    return view('contact');
});
1
2
3
4
2
3
4
REMARK
Do not include the extension .blade.php in the parameter of the view() function
- When the URL http://vinyl_shop.test/contact (opens new window) is visited, the view contact.blade.php is shown
# Single line notation
- The code
Route::get('contact', function () {
    return view('contact');
});
1
2
3
2
3
can be replaced by
Route::view('contact', 'contact');
1
# EXERCISE: Refactor home page
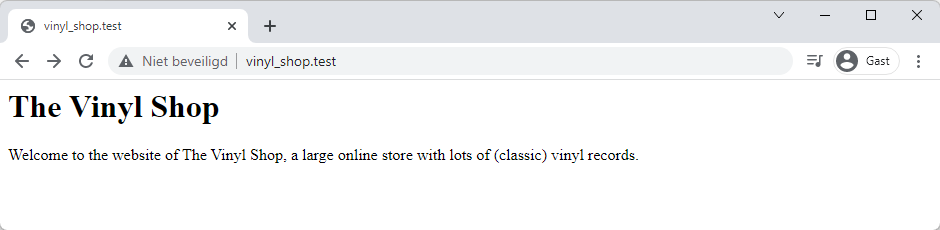
- Create a new home page home.blade.php (with a
h1and ap)
<h1>The Vinyl Shop</h1>

<p>Welcome to the website of The Vinyl Shop, a large online store with lots of (classic) vinyl records.</p>
1
2
3
2
3
- Refactor the route to it with a single line notation
Route::view('/', 'home');
Route::view('contact', 'contact');
1
2
2
# Organizing views in subfolders
- It's best practice to group the views of a project in subfolders
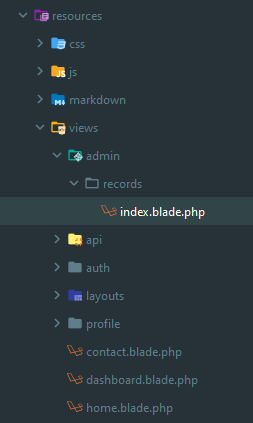
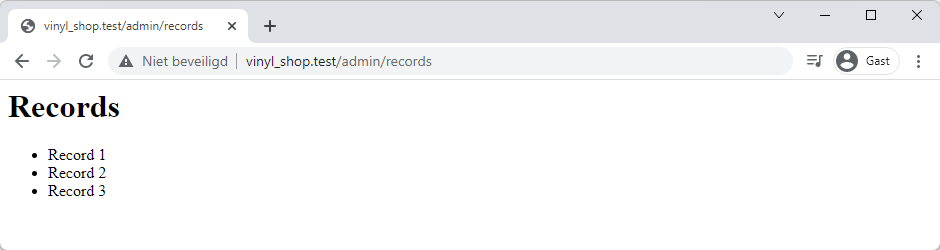
- Make a subfolder admin/records in resources/views and add a new view index.blade.php in this subfolder
<h1>Records</h1>

<ul>
    <li>Record 1</li>
    <li>Record 2</li>
    <li>Record 3</li>
</ul>
1
2
3
4
5
6
7
2
3
4
5
6
7
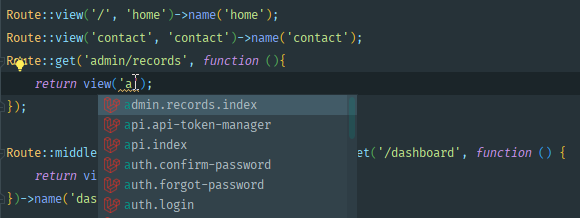
- Add a new route 'admin/records' (URL = http://vinyl_shop.test/admin/records (opens new window)) to this view in the file routes/web.php
Route::get('admin/records', function (){
    return view('admin.records.index');
});
1
2
3
2
3
TIP
Press ctrl + space inside the quotes to show a list of all views
REMARKS
- We use the extended
Route::get()notation here as we want to pass some data to this view in the next section, which is impossible with the single line notation - The view can also be returned with the statement
return view('admin/records/index'), in which a/is used instead of a.to navigate through the folder structure of the views
# Passing data to the views
- Create an array
$recordswith some data in the 'admin/records' route - The
view()function can receive an associative array as its second argument, through which this data can be passed to the view
Route::get('admin/records', function (){
    $records = [
        'Queen - Greatest Hits',
        'The Rolling Stones - Sticky Fingers',
        'The Beatles - Abbey Road'
    ];

    return view('admin.records.index', [
        'records' => $records
    ]);
});
1
2
3
4
5
6
7
8
9
10
11
2
3
4
5
6
7
8
9
10
11
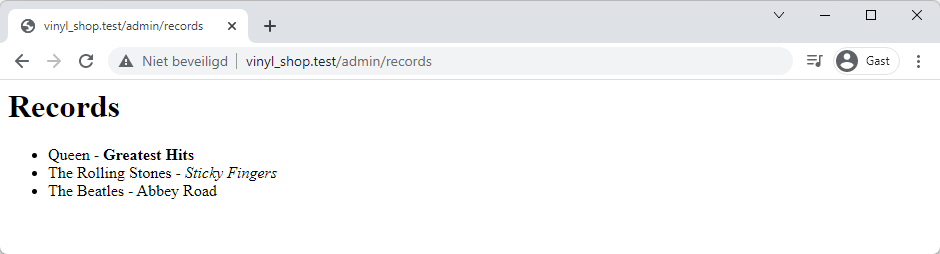
- In the view index.blade.php, the key of this associative array can be used to access the data
<h1>Records</h1>

<ul>
    <?php
        foreach ($records as $record){
            echo "<li> $record </li>";
            //echo '<li>' . $record . '</li>';
        }
    ?>
</ul>
1
2
3
4
5
6
7
8
9
10
2
3
4
5
6
7
8
9
10
REMARK
Notice that it is the key of the associative array that must be used to access the data in the view. If you would write
return view('admin.records.index', [
    'someSillyName' => $records
]);
1
2
3
2
3
in the route, the view must be adjusted accordingly
<ul>
    <?php
        foreach ($someSillyName as $record){
            echo "<li> $record </li>";
            //echo '<li>' . $record . '</li>';
        }
    ?>
</ul>
1
2
3
4
5
6
7
8
2
3
4
5
6
7
8
# Blade syntax: @foreach and double curly braces {{ }}
- Using Blade, the
foreachloop in the view index.blade.php can be simplified
<h1>Records</h1>

<ul>
    @foreach ($records as $record)
        <li>{{ $record }}</li>
    @endforeach
</ul>
1
2
3
4
5
6
7
2
3
4
5
6
7
- Blade-specific syntax always starts with
@ - The PHP
foreachloop is replaced by a Blade@foreachloop- Ends with
@endforeach/ no surrounding braces{ } - The (body of the) loop contains HTML and PHP
- Data passed to the view can be displayed by wrapping this data within double curly braces
{{ }}
- Ends with
REMARKS
- Blade
{{ }}statements automatically escape (any HTML in) the data to prevent cross-site scripting (opens new window) (XSS) attacks
$records = [
    'Queen - <b>Greatest Hits</b>',
    'The Rolling Stones - <em>Sticky Fingers</em>',
    'The Beatles - Abbey Road'
];
1
2
3
4
5
2
3
4
5
@foreach ($records as $record)
    <li>{{ $record }}</li>
@endforeach
1
2
3
2
3
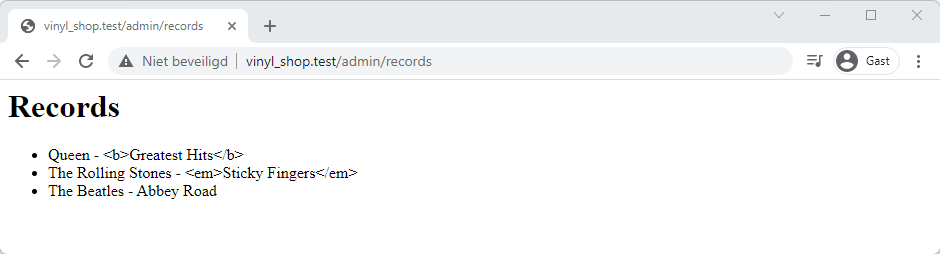
- Use
{!! !!}if unescaped, raw output is needed
@foreach ($records as $record)
    <li>{!! $record !!}</li>
@endforeach
1
2
3
2
3
# Route groups
- Route groups allow you to share route attributes, such as middleware (later in this course) across all the routes within the group
- The
prefix()method can be used to prefix each route in the group with a given string - Combine all routes, starting from http://vinyl_shop.test/admin/ in a group with the prefix admin
Route::prefix('admin')->group(function () {...})
// Old version
/*
Route::get('admin/records', function (){...});
*/

// New version with prefix and group
Route::prefix('admin')->group(function () {
    Route::get('records', function (){
        $records = [
            'Queen - Greatest Hits',
            'The Rolling Stones - Sticky Fingers',
            'The Beatles - Abbey Road'
        ];
        return view('admin.records.index', [
            'records' => $records
        ]);
    });
});
1
2
3
4
5
6
7
8
9
10
11
12
13
14
15
16
17
18
2
3
4
5
6
7
8
9
10
11
12
13
14
15
16
17
18
- Open http://vinyl_shop.test/admin/records (opens new window) in a browser
REMARKS
- If you now open http://vinyl_shop.test/admin/ (opens new window) or http://vinyl_shop.test/admin (opens new window) in a browser, this results in a 404 error because these routes do not exist
- You can easily solve this by redirecting these URLs to an existing URL like http://vinyl_shop.test/admin/records (opens new window)
Route::prefix('admin')->group(function () {
    Route::redirect('/', '/admin/records');
    Route::get('records', function (){...});
});
1
2
3
4
2
3
4
# Named routes
- Named routes allow the convenient generation of URLs or redirects for specific routes
- You may specify a name for a route by chaining the
name()method onto the route definition
// unnamed route
Route::view('/', 'home');

// named route
Route::view('/', 'home')->name('home');
1
2
3
4
5
2
3
4
5
- The
name()method may be used to prefix each route name inside a group
// unnamed group prefix
Route::prefix('admin')->group(function () {
    ...
});

// named group prefix
Route::prefix('admin')->name('admin.')->group(function () {
    ...
});
1
2
3
4
5
6
7
8
9
2
3
4
5
6
7
8
9
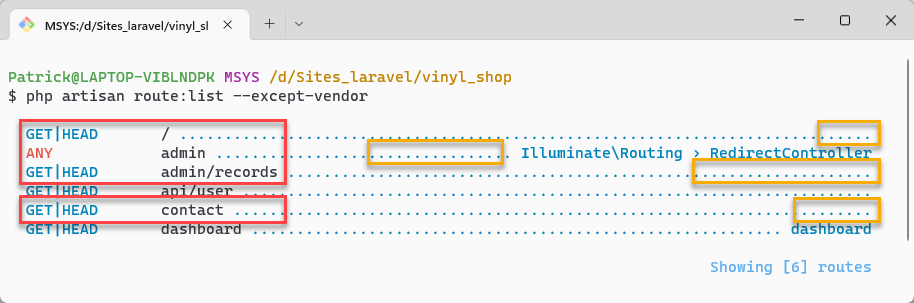
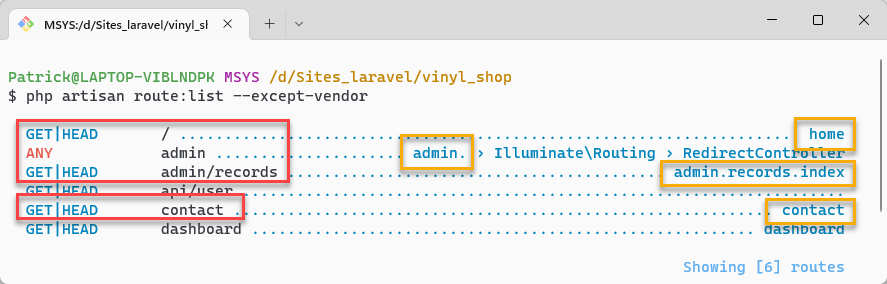
# php artisan route:list
- Artisan is the command-line interface (CLI) included with Laravel, which assists in building Laravel applications
TIPS
- When you type
php artisanorphp artisan listin your terminal, you get a list of all the available Artisan commands - In order to get help (available arguments and options) on a specific command, precede the name of the command with
help
$ php artisan help route:list
Description:
  List all registered routes

Usage:
  route:list [options]

Options:
      --json                       Output the route list as JSON
      --method[=METHOD]            Filter the routes by method
      --name[=NAME]                Filter the routes by name
      --domain[=DOMAIN]            Filter the routes by domain
      --path[=PATH]                Only show routes matching the given path pattern
      --except-path[=EXCEPT-PATH]  Do not display the routes matching the given path pattern
  -r, --reverse                    Reverse the ordering of the routes
      --sort[=SORT]                The column (domain, method, uri, name, action, middleware) to sort by [default: "uri"]
      --except-vendor              Do not display routes defined by vendor packages
      --only-vendor                Only display routes defined by vendor packages
  -h, --help                       Display help for the given command. When no command is given display help for the list command
  -q, --quiet                      Do not output any message
  -V, --version                    Display this application version
      --ansi|--no-ansi             Force (or disable --no-ansi) ANSI output
  -n, --no-interaction             Do not ask any interactive question
      --env[=ENV]                  The environment the command should run under
  -v|vv|vvv, --verbose             Increase the verbosity of messages: 1 for normal output, 2 for
more verbose output and 3 for debug
1
2
3
4
5
6
7
8
9
10
11
12
13
14
15
16
17
18
19
20
21
22
23
24
25
26
2
3
4
5
6
7
8
9
10
11
12
13
14
15
16
17
18
19
20
21
22
23
24
25
26
php artisan route:listshows all the routes inside your project (most of them comes from the Jetstream authentication package)- Use
php artisan route:list --except-vendorto hide the routes from the vendor packages (like Jetstream)
# Benefits of named routes
WARNINGS
- In this course we recommend that you only refer to named routes and never to the actual URL's
- If you need to change the URL of some request, named routes automatically resolve to the correct URL everywhere
- If you hard code the URL's in your application, you would need to update the URL everywhere you've used it
- Look at the contact route:
Route::view('contact', 'contact')->name('contact');
1
- You can link to this route with the URL or with the name of the route:
// link with URL
<a href="/contact">Contact</a>

// link with route name
<a href="{{ route('contact') }}">Contact</a>
1
2
3
4
5
2
3
4
5
- When you update the route URL from
contacttocontact-us:
Route::view('contact-us', 'contact')->name('contact');
1
- All pages with a URL link to the contact-us page must be updated while the links with the route name are still working
// all links with the URL href="/contact" are broken
// all links must be updated to href="/contact-us" 😒
<a href="/contact">Contact</a>

// all the links with the route name {{ route('contact') }} are still working 😀
<a href="{{ route('contact') }}">Contact</a>
1
2
3
4
5
6
2
3
4
5
6